...Growing, Building, Cooking, Preserving, Crafting...

2006 began our urban homestead when I broke ground on a garden, which now includes perennial fruits, flowers, & many vegetable varieties. We dream of solar panels, keeping bees and hens. Until then we'll continue growing and preserving our own fruits and vegetables, building what we can for our home, cooking from scratch, and crafting most days.
Showing posts with label Cooking and Preserving. Show all posts

8.10.2011

Chilling Out While Cooking up a Storm


Pickled Beets with Cumin and Cloves--the reds are homegrown
The kitchen has been such a busy place lately that I hardly know where to begin.  Besides canning like crazy, the dehydrator and food processor have been working overtime as I preserve as much as possible in the height of the season--drying sage, drying chopped beet greens (a la the dried spinach I made previously), and turnip chips (more on those later.)  It feels like we're finally getting a break from the super hot weather.  But Saturday was still very humid and after running around and working our rummage sale, the last thing we wanted to do was heat up the house cooking inside.  Enter chilled soup.  I bought a dozen ears of corn at the farmers' market on Thursday and cut off all the kernels for freezing.  As we baked our pizza at a high temperature on Friday, I roasted the remaining cobs then put them into a stockpot with my ongoing bowl of vegetable trimmings from the fridge.  Ben bought a half dozen more ears of corn at the farmers' market on Saturday, grilled them and collectively we made a chilled blender soup that evening.

Chilled Grilled Corn Soup with Chiles, Lime, and Cilantro Cream
Serves 4

Adapted from A New Way to Cook by Sally Schneider.


6 ears fresh corn, shucked, oiled, and grilled
2 t. olive oil
1 small onion, roughly chopped
1-2 garlic cloves, roughly chopped
1 small serrano or jalapeno pepper, seeded and minced
1 1/2 t. ground cumin
3/4 t. kosher salt
1/2 t. sugar/honey/xylitol
2 c. corn stock or vegetable stock
2 c. almond or coconut milk
2 T. lime juice
Ground black pepper

Cilantro Cream:
1/4 c. sour cream
1/4 c. buttermilk
1/4 c. finely chopped fresh cilantro
1 t. minced fresh chives or scallions
1/4 t. kosher salt
1/4 t. sugar/honey/xylitol
1 T. lime juice

Garnish:
1/4 c. lean smoked ham, diced small
Reserved corn kernels
Thinly sliced zucchini or summer squash

Slice the kernels off the grilled corn--you should have 4-5 c. of corn kernels.  (Set aside about 1/4 c. kernels for garnish.)  Combine all of the soup ingredients in a large bowl then blender in batches until smooth.  Season to taste.  Mix all ingredients for cilantro cream and set aside.  Combine ham and reserved corn kernels.  Serve soup in bowls drizzled with cilantro cream.  Place sliced squash in center of bowl and top with ham/corn.  (Leftovers can be heated later if desired.)

Last night I prepared another cold soup--I was still feeling the heat of the day, I needed something ultra-quick but healthy to serve for dinner since I would be running out to teach another class, and I was trying to work through the load of veggies currently in the crisper drawer as another family vacation draws near   (hence the seemingly random addition of lettuce in this soup).

Chilled Green Curry Cucumber Soup
Serves 4

Adapted from 1000 Vegetarian Recipes by Carol Gelles.

Cool and Refreshing
2 medium (8-inch long) peeled, cucumbers
3 medium scallions (white and green parts)
1 head romaine lettuce
1 c. vegetable stock
6 sprigs fresh dill, or 1/2 t. dried dill weed
1 c. almond milk
1 T. white distilled vinegar
1/4 t. Worcestershire sauce
1/4 t. salt, or to taste
1/8 t. freshly ground pepper
1-2 t. green curry paste, diluted with 1-2 T. stock or almond milk
Plain whole milk yogurt
Fresh dill sprigs

Combine all ingredients in a blender until smooth.  Serve chilled, garnished with yogurt and dill.

Ater a preservation presentation last week I was talking to a student about how to use all the zucchini and summer squash that's busting out of the garden and at the farmers' markets these days.  I think I should post a Top Ten list of ideas.  One that I tried on Friday night Pizza Night was to use zucchini or squash as a "crust" for my gluten-free pizza.  I ran out of time to replenish the supply of homemade gluten-free crust I usually keep frozen so this idea was born.  I thinly sliced our homegrown pattypan squash using my Japanese slicer then layered it on the bottom of the stoneware baking pan that was dusted with cornmeal.  Seasoned the squash lightly with salt and pepper then proceeded to add the night's toppings--sauteed mushrooms, black olives, sauteed swiss chard, broccoli, a smattering of tomato sauce (so the pizza didn't get overly wet), and shredded mozzarella.  Of course it wasn't a pizza you could pick up and eat by the slice, but a fork worked just as well and it was all the yummy, gooey, cheesiness of pizza, but low-carb and high-veggie.

Italian Pickled Zucchini
Since the weekend I've been running a pickle marathon.  On Sunday I canned another batch of dilly beans--this time for the farmers' at Pinehold Gardens for whom I do a worker share, soaked and canned a batch of Italian Pickled Zucchini using some gorgeous orange zucchini and Benning's green pattypan squash I found at the South Milwaukee Farmers' Market last Thursday, and roasted both red and golden beets to make Pickled Beets with Cumin and Cloves yesterday.  I love how these beets turned out, especially the golden ones.  At least half of the batch already has someone else's name on it--the generous woman who donated a ton of quart canning jars to the Urban Ecology Center and boxes of other canning jars to me over the winter said that she'd barter for pickled beets.  I am more than happy to oblige and will hand-deliver them to her in just a couple of weeks.  The last pickling project on my list this week is Dill Carrots.  The carrots from our garden are looking excellent and I believe there are still some smaller ones that I can preserve whole in pint jars.  Then on the seventh day I will rest and take a vacation.
Sliced Very Thinly

7.30.2011

Fruitfulness


Two bucketsful and I could have picked two more!
The fruit keeps rolling in.  I just picked up six quarts of black currants from the farmers' market.  I've been running a tab with our CSA farm this year at the farmers' market in exchange for my worker share hours typing recipes for their newsletter and putting up their personal preserves.  I love the idea of bartering like this.  I also love that I know exactly who picked my berries.  A fellow Master Preserver and domestic artist friend works at the farm on Fridays and she assured me that she picked these dark fruits with love and care (and a flock of chickens following her around the farm's orchard where this feathery crew is kept).  I will be cooking down the currants and making them into a rich juice concentrate early next week.  Today I've got cooked blueberries hanging in cheesecloth over a bowl in the kitchen.  Those will be the first into the canner as I begin to replenish my supply of juices for the season.  If local juice-making interests you, please check out the class I'm teaching on August 25 at the urbanecologycenter.org where we will process a batch of juice concentrate and sample some homemade non-alcoholic refreshers just in time to give you ideas for your late summer soirees.

I also retuned to the lakefront to harvest more wild black raspberries this week.  I was trying to top off my bucket (or pick a second bucket) so I could make a batch of simple jam.  Ben had a comp. day so I took the opportunity to do some solo picking while he watched V.  I crept out just after sunrise, hopped on my bike with Vera's toy bucket dangling from the handlebars, and bore the light rain to fill another container.  The mosquitoes were even worse than days before making me believe they'd signed a contract with the raccoons and other critters inhabiting the berry-laden slope to protect their food supply.  It was one of those instances when I pull our homebirth experience to the front of my mind and say to myself "if I can do THAT, then I can get through THIS."  I still managed to emerge from the bramble nibbled to bits with bug bites through my long pants and sweatshirt and in other unmentionable places.  But for such a great cause!  The thought crossing my mind was that there's NO PACKAGING with these fruits as there are even when I pick up at the green market--though at least those containers get reused and recycled.  As Ben graciously helped me around the house on Thursday, I was able to process my raspberry jam and even have time to go out with him that night for a birthday celebration.

Fruit fruit fruit!  It's everywhere these days.  I managed to process the rest of the peaches Ben brought home from work and put together a peach shortcake on Wednesday night.  Though it's not quite time for local peaches, one could set this recipe aside to use in the next few weeks.  I recently acquired a very well worn copy of The Settlement Cookbook, a domestic culinary classic.  No glossy photos or verbose recipe lead-ins, but scads of simple, classic recipes for the home cook.  After Vera's jammy time we three sat in the dimly lit front vestibule observing the rainy evening, and savoring each spoonful. (Vera liked the "cream" best.)

Peach Shortcake (Gluten-Free)
Serves 4

I adapted this for the gluten-free crowd.  One could also use strawberries, blueberries, apricots, raspberries, or whatever fruit is in season right now.  The main thing is to keep it simple.


1 c. all-purpose gluten-free flour
1T. + 1 t. baking powder
1/4 t. xanthan gum
1/4 t. salt
1 T. granulated xylitol or sugar
1/2 stick of cold unsalted butter (2 oz.), cut into small cubes
6 T. milk (or your choice...I used almond milk)

Preheat oven to 450 degrees F.  Mix dry ingredients, work in butter with a fork, pastry blender, or your fingers (this is my preferred method, but only if you possess "cold hands.")  Add milk quickly then toss on floured surface.  *Pat, roll, and cut with large biscuit cutter or roll to fit 2 pans and bake 12-15 min.  Cool just slightly and split biscuits in half filled with cold, sweetened fresh fruit, and fresh whipped cream (see below.)


*You can also cut them out and place is a greased muffin pan.


Fresh peaches
Granulated xylitol or sugar, to sweeten as desired
Heavy whipping cream
Powdered sugar
Vanilla extract
Fresh red currants, to garnish (optional)

Mash peaches with potato masher or fork, add sweetener and mash again.  Taste for sweetness.  With whisk, electric beaters, or electric mixer fitted with whip attachment, make sweetened whipped cream ("Chantilly Cream").  Approximately 1 1/2 c. whipping cream, 1/3 c. powdered sugar (or for your taste), and dash of vanilla.  Whip until fluffy and light.

Last night and for the first half of today I had/have a mini-staycation.  Ben and Vera headed down to Chicago to visit Gram-E and Gramps and some other relatives.  I will be joining them by dinnertime after I finish preparing for my Herbal Ice Cream and Baking with Herbs class this coming Monday.  So with no one to depend on me after work yesterday, what do you suppose I did?  At this point, I never quite know what to do first when I don't have a youngin' to attend to.  Directly from work, I went to the annual used book sale at the Cudahy Family Library where I took a small stash of birthday money and lots of time to browse the tables of gently used reading material.  I was very inspired by one of my fellow crafty mamas to look for books that not only have great stories, but are beautiful illustrations.  Vera doesn't need many books for her current interest level, but I found some great stories that we can read together when she's a bit older.  I also found some cool science-based books that I'm hoping she'll like down the road.  It made me wonder how many kids will be interested in picking up these types of books when they have the internet at hand.  One of my goals is to cultivate Vera's love for the hands-on experience of books.  I know "electronic book-reading devices" are great and easy, especially for traveling--as I was just discussing with my close friend at our playdate on Wednesday--but I can't resist touching, feeling, and being surrounded by books and books and books.  I hope Vera will savor them just the same.  Here are some of my favorite finds yesterday.

Beautiful illustrations!
I love the geometry of these graphics--from one of our favorites Don Crews
Will be fun to read this one after a Cape whale watch
Who doesn't love a good European fairy tale?
Ant Queens and Snow Queens
A little science and a little mystery (one of mommy's adolescent favorites--Trixie Belden!)

First Dilly Beans of 2011--Yellow Wax
Last night's break from childcare brought out the best of my geeky side.  Though it was completely tempting to eat bon bons and lie on the couch all night, I opted to make my first batch of dilly beans for the season, clean the fridge (therapy!), fold laundry, and shelve my new books.  Add a cold glass of white wine and it was a night in heaven.  (Doesn't take much to please a busy mama these days.)  But I can't wait to see my two sweeties later today.  Checked in last night and it sounded like they were having fun in swimsuits with G and G's backyard hose.  It was heart-warming to hear my little Bippy's tiny voice on the other end of the phone saying "Hi Mommy, I love you"...and knowing I'll have some fresh pickles to present to her when she returns.

11.24.2010

Countdown to Turkey Time

I started cooking yesterday afternoon.  I'm trying to manage not only my oven space (different dishes need to be baked at different temps., of course), but also to get part of the mess out of the way so I can relax a little with my family tomorrow.  The biggest challenge has been coordinating space in the fridge for the bulk of ingredients from a Thanksgiving CSA share I picked up last week, the last of our garden harvest (which I frantically harvested yesterday after the overnight freeze), and the staged and finished dishes for Thursday's meal.  I find this thrilling!  I just realized I should have posted my Thanksgiving menu and recipes earlier than today in case someone was still looking for ideas, but since many of these dishes aren't exactly traditional, one could prepare them for any feast especially other upcoming holiday meals.  I am happy to say that most of the ingredients are from local producers and our own garden.  My parents are bringing wine from a winery they recently visited near their home in east-central Illinois.  A feast we will have as we give thanks for the many fortunes and much happiness we've had this past year.

Brined and Roasted American Heritage Bronze Turkey
Turkey Gravy
Cornbread Stuffing with Fruit and Polenta Bread
Classic Garlic Mashed Potatoes
Brined Brussels Sprouts with Lemony Mushroom Melange
Gluten-Free Sesame Bean Buns
Jellied Cranberry Salad with Spiced Apples and Pecans
Maple Sweet Potato Cheesecake with Gluten-Free Quinoa Walnut Crust

Shelled Acorns
My first acorn experiment is complete.  I patiently took these nuts from tree to meal/flour in about two days.  The initial attempt was a bit tedious, but I feel if I repeated it, I'd get my cracking technique down pat, which would save loads of time.  With some minor changes and adaptations, I referred to the instructions in The Urban Homestead book I referenced in a previous post.  This guide suggested that one soak the acorns first--which I did--then discard the ones that float.  On the contrary, I learned that the ones that float were the good and all that sank were rotten.  Then I got out the Vise-Grip and cracked away.  Of course Ben always walks into the kitchen at the most appropriate time.  He said, "this looks like the 'Black Walnut Experiment,'" referring to another urban adventure we had at our apartment downtown.  A co-worker had given me a grocery sack full of black walnuts after I excitedly inquired about them to make nocino (pronounced "no-CHEE-no"), a bitter black walnut liqueur I'd tasted on a culinary tour outside of Bologna.  This intensely flavored alcohol is made from nuts traditionally collected between June 24-25 because of the magical powers of the dew on that specific eve.   Well, these nuts sat there from June 24 to approximately December 24 before I finally got around to cracking them open.  In the cold, we set up some tarps on our tiny balcony and went to town with hammers, tweezers, and toothpicks doing our best to draw out as many nut meats as possible.  Most flew off the balcony with every whack of the hammer, much to the delight of the squirrels waiting below.  We ended up with a 1/2-pint of nuts, but it wasn't for naught as I'm determined to find some lesson in all of my urban homesteading trials.  I developed a much greater appreciation for small-scale (and I mean very small scale (like the elderly man who sells hand-shelled hickory nuts at the Dane County Farmers' Market) nut processors.  Now you can imagine the hesitation of Ben's expression when he saw I was at it again with these acorns.  After cracking them all I put them in my classic Osterizer, covering the nuts with water.  I soon realized this machine wouldn't cut it so I transferred them to the hand-be-down vintage Vita-Mix from my mother-in-law and that made quick work of these nuts.  The VM never fails!  I was left with acorn "mash."  Acorns contain lots of tannins (very bitter, astringent components also found in red wine) that must be soaked out before the nuts can be consumed.  Older wild foraging guides call for boiling the mash several times and dumping the water.  This takes a lot of energy so my guidebook suggested soaking in a bowl of water instead.  I tied the mash in a piece of scrim (you can use cheesecloth) and filled the bowl with water.  When the water became dark and cloudy I dumped it and filled it again.  I repeated this step for about 24 hours (leaving it to sit overnight) and finally the astringency was gone.  I spread the mash on a silicone baking mat on a cookie sheet and dried it at a low oven temp.  Then I whizzed it in the spice grinder to make a dark, sweet-nutty smelling meal/flour.  It can be added or partially substituted in savory baking recipes.  
Never Fails!


Soaking out the Tannins
Dried Mash

Final Ground Acorn Meal


On that note, I used some of my sunchoke flour yesterday to make cornbread for our Thanksgiving cornbread stuffing.  I indicated my substitutions in the recipe below so you could make it without these odd flours.

Polenta Cornbread
Serves 6

Use in place of your favorite cornbread or take it a step further, turning it into cornbread stuffing.

Sunchokes add a lovely earthy, nutty flavor to this bread.
5 large eggs, whisked
1 1/2 c. buttermilk
1/4 lb. unsalted butter, melted
1/3 c. finely sliced scallions
1 1/2 t. salt
2 c. all-purpose flour (I used 1 1/4 c. APF, 1/2 c. sunchoke flour, 1/4 c. wild rice flour)
1 1/2 c. fine grind polenta
2 T. baking powder
2 t. baking soda
1 c. grated Asiago cheese (or other cheese of your choosing)

Preheat oven to 350 degrees F.  Lightly butter 9x13-inch baking dish.  In medium bowl, whisk together eggs, buttermilk, butter, scallions, salt.  Set aside.  In large bowl, combine flour(s), polenta, baking powder, baking soda, cheese.  Add wet ingredients to dry and stir until there no large lumps.  Do not overwork.  Spread batter in baking dish.  Bake 30-35 min. or until golden brown and a skewer inserted in center comes out clean.  Cool on rack.  

Jump, Jump, Jump!
Just in time for more Thanksgiving meal preparations today, an early holiday delivery arrived from Grammy and Papa for Vera yesterday.  I call it "Mommy's Little Helper."  You may have seen these towers.  They are meant for kids to be able to reach the countertop to observe or help prepare meals.  Vera's always asking to go "up and down," which in this case mean's "up" when I'm cooking.  She's curious about what I'm chopping, mixing, and sauteeing.  Now she can stand beside me--in her little apron--and view her own personal cooking show every day.  So far she's just used this piece of equipment as a jungle gym under my supervision, of course.  Oh my, the hysteria (or "high-steria" as my Boston-bred father-in-law would say)!  But that will no doubt wear off and hopefully she'll want to help me "cook."  Apparently it can double as a puppet theatre.  I'm expecting to see some Tony Award-Nominated sock puppets shows before she leaves home.  In the meantime maybe I can get her learning about cooking early on. 


10.17.2010

Here, There, and Everywhere

Salsa Party Setup
I felt like we were all over the place this weekend.  It was another whirlwind Friday through Sunday, but fun was had by all.  Friday night I put on my first preserving party.  A good friend had some other friends and co-workers interested in learning how to preserve so months ago we began organizing a salsa party.  She prepared a festive taco bar along with a pot of spicy tortilla soup, played Latin music, but stopped just short of running "La Bamba" on a loop on the basement television.  While the guests mingled, ate, drank, and made merry, I turned it on in the kitchen preparing salsa then demonstrating to the guests how to can it.  Everyone got to take home two jars of salsa as well as some other lovely parting gifts of Jane's choosing.  I don't know about all of them, but I had a blast!  I feel like many of the guests took home some new skills--or at least they now have a desire to try canning for themselves.  To be honest, I'd been a bit nervous about teaching food preservation to a group that had been imbibing, but I made sure to (mostly) abstain myself so that at least one person was guaranteeing the salsa's safety.  Perhaps in the future I can host bridal canning showers (give the gift of domestic skills) or more weekend preserving parties.

Spanish Eclectic Cottage
Saturday we drove down to Glen Ellyn, IL (western suburbs of Chicago) to visit Ben's parents.  And speaking of preservation, we went on the annual Historic Home Tour put on by the Citizens for Glen Ellyn Preservation.  We made it to four of the six homes/buildings on the tour.  I've always been taken by this kind of activity.  Ben says it's because I'm nosy about how people live, which is completely false (though I probably should have been an anthropology major).  What I really enjoy is seeing how people decorate they're homes and getting ideas for our own.  And ever since my "Living Environments" class in high school, I can easily geek out when discussing architectural features like clipped gables, rafter tails, and corbels.  We toured two gorgeous Arts and Crafts homes, which both had cozy nooks and smaller rooms that made me want to curl up then and there with a book or some good music.  We also toured a Prairie Style home as well as a "tiny" Spanish eclectic cottage--more elaborately decorated than my taste, but absolutely stunning.  I gathered lots of new ideas, especially for remodeling our own kitchen soon.

That night we got a sitter for Vera and drove into Chicago with Ben's parents for dinner at the Atwood Cafe on the ground floor of the Burnham Hotel.  We enjoyed a delicious local, seasonal menu then headed over to the Goodman Theatre to see a musical version of Candide by Voltaire.  We found this French satire, written in the mid 18th century, to be timeless.  Following all the unhappiness, hatred, and dishonesty in the world, it concluded with the central couple moving to a farm and growing vegetables--something hopeful for the future in this crazy world.  What a coincidence that we should see a performance like this.  Reminds me that we're doing the right thing in building our urban homestead.  Hopefully we too are building hope for the future.

8.18.2010

Enjoying the Summer Harvest


One of the many dragonflies that have "landed" in Milwaukee.
Ingredients for Cherry Lemonade
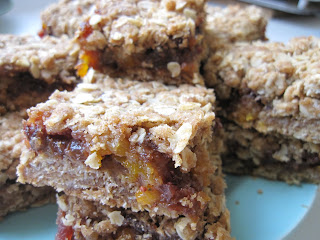
Today we had a visit from my cousin (and her family) from Roanoke, Virginia.  It was a mid-afternoon get together so I wanted to prepare some light refreshments.  I love the cooler weather we've been having because it's much more comfortable for spontaneous baking.  I prepared some simple Cherry Lemonade Spritzers with about 2 oz. cherry "syrup" poured off of my canned sweet cherries, 6 oz. lemonade (purchased or freshly squeezed), and 3-4 oz. of sparkling water.  You can adjust the recipe to your tastes; this is just a starting point.  I also cut up some juicy sweet Door County peaches I picked up at the farmers' market over the weekend and baked fruit crumble bars.  These bars could be made with any local fruits you may dry this season--cherries, cranberries, apricots, peaches, apples, etc.  I had raisins, dried Wisconsin cranberries, apricots, and dates on hand and used 1 c. of each.  I also used Wisconsin-milled Oly's oats.

Fruit Crumble Bars
Makes about 1 dozen large bars

Adapted from Afternoon Delights by McNair and Moore.


4 c. dried fruit
1/2 c. xylitol (or granulated sugar)
butter wrapper for greasing
3 c. old-fashioned rolled oats
1 1/2 c. all-purpose flour
1 c. firmly packed brown sugar
1 1/2 t. ground cinnamon
3/4 t. salt
3/4 t. baking soda
1 c. (2 sticks) unsalted butter, melted

In a saucepan, combine dried fruit, xylitol, and 2 c. water.  Place over medium heat and cook, stirring frequently, until fruit is plumped and tender and liquid is absorbed; cooking time will vary with type and dryness of fruit.  Remove from heat, spread on a sheet tray or plate to cool for a few minutes, then transfer fruit to a food processor and pulse a few times to puree coarsely.  Set aside.  Preheat oven to 350 degrees.  Grease a 9x13-inch baking pan with butter wrapper.  Set aside.  In a bowl, combine oats, flour, brown sugar, cinnamon, salt, and baking soda.  Stir to mix well.  Add butter and mix until well blended and crumbly.  Remove 2 c. of oat mixture and set aside.  Distribute remaining oat mixture in prepared pan and press gently to form even layer.  Spoon pureed fruit over layer and spread evenly.  Distribute reserved 2 c. oat mixture evenly over fruit and press gently to form top crust.  Bake about 30 min. or until surface is lightly browned.  Remove and cool on a wire rack then cut into 12 equal bars.  These can be stored at room temp. for up to 2 days.

I've also been trying to creatively use all the eggplants coming out of our garden.  This is one of the new vegetables I'm growing this year that I've really enjoyed so far.  It seems like every season I fall in love with a different vegetable--even ones that may seem ordinary--and have fun creating new recipes.  This one was adapted from a friend of mine.  The eggplant slices, filling, and tomato sauce can be prepared a day ahead, which came in handy for us during this busy week.

Rolled Stuffed Eggplant

Just out of the oven!
Serves 4-6

2 medium to large eggplants, peeled
1 beaten egg
½ c. milk
2 t. cooking oil plus more for cooking
1/8 t. salt
½ c. grated Parmesan cheese
½ c. ricotta cheese
2 T. chopped basil
Pepper to taste
Fresh tomato sauce (see recipe that follows)

Cut eggplant lengthwise into about 10 1/4-inch slices.  Place in a single layer on a sheet tray, sprinkle with salt and cover the layer with paper towel; repeat with remaining eggplant and let sit about 30 min. For batter combine egg, milk and 2 t. oil.  Add flour and salt; beat until smooth.  Dip eggplant slices into batter and cook on both sides in a small amount of hot oil until golden brown.  Drain on paper towels.  Combine Parmesan, ricotta, parsley, and pepper.  Place 1 T. of cheese mixture in the center of each eggplant slice; roll up jelly-roll style.  Place seam side down in baking dish (or hold with a toothpick if you feel more comfortable).  Bake in 400 degree oven for 25 minutes or until heated through; broil on high another 3 minutes.  Serve eggplant rolls with warm tomato sauce and additional Parmesan if desired.


Fresh Tomato Sauce


This recipe is very flexible; the amounts are up to you depending how thick and seasoned you like it.  You can also add any end pieces of eggplant not suitable for rolling; dice these medium.


Fresh tomatoes, cored and diced large
Fresh or dried basil and oregano
Fresh or granulated garlic
salt and pepper to taste


Combine everything but salt and pepper in a saucepan and cook down to your desired thickness.  Season to taste.


Although this is still the height of the summer season, I am planning for fall preserving and storage.  This week I harvested dried beans from my rattlesnake bean trellis.  This is the first year I've let them fully dry on the vine.  So far I have one pint, but there are many more beans still on the trellis.  One goal for next year is to add more bean trellises.  It's nice knowing that if it really came down to it I could grow my own protein and perhaps get all the nutrients I need from my own small parcel.  I also picked sage, air-dried it for at least a week on a sheet tray then ground it up in my spice grinder (coffee grinder dedicated to grinding herbs and spices) and laid it out to dry further.  If you save sage this way, be sure to fully dry it after grinding.  Last year I stored it immediately after and it molded, but I nearly put it into a Thanksgiving dish because the mold was not visible (same color as the sage); it was the smell that gave it away almost too late.
Homegrown "rubbed" sage
Over the weekend I was busy canning two cases of dilly beans for friend and former co-worker, David Swanson of Braise.  In the summer, preserving is like a natural, weekly activity for me--like doing laundry.  Pretty soon I'm going to need a production kitchen.  

6.30.2010

We've Got the Beets

One advantage of having a spouse who also works in the line of food is that there's never a shortage of it being brought into our home.  Ben works for SHARE (he loves it when people say, "You work for CHER!!!"), a monthly volunteer-run food-buying club.  One of their offerings is a selection of organic produce and he often purchases some of the month's surplus.  Last month he brought home a case of red beets, sans greens.  I love beets and was excited about this home delivery, but after a week of beet salads, beet juice, and roasted beets I became a bit overwhelmed with what I would do with the whole case as I tried to store them in our unreliably cool basement.  Today I finally decided to move forward and process them.  This weekend I plan to can pickled beets, tonight for dinner I prepared a salad with walnuts, blue cheese, and maple horseradish glazed beets (see recipe below), and tomorrow I plan to make one of my favorite cakes--chocolate beet, which is great for sneaking veggies into kids' meals with them suspecting a thing--as long as the chocolate's there.  (Personally, you could cover my shoe in chocolate and I'd probably go for it.)  Enjoy these beet recipes.  And if you love them as much as me, keep your eyes peeled for local beets at the farmers' markets.

Maple Horseradish Glazed Beets
(I believe this recipe originally appeared in Gourmet magazine)
Serves 4

I tossed these beets with fresh salad greens, toasted walnuts, crumbled blue cheese, and a basic balsamic vinaigrette.  Add a little of the horseradish/maple sauce to the vinaigrette before tossing if you want.  The hot beets will slightly wilt the salad, but I like this effect.  You could also chill them before tossing.

1 3/4 lbs. medium red beets (3 3/4 lbs. with greens), stems trimmed to 1 inch
1/2 stick (1/4 c.) unsalted butter
3 T. bottled horseradish (not drained)
2 1/2 T. maple syrup
2 1/2 T. cider vinegar
1/2 t. salt
1/4 t. black pepper

Put oven rack in middle position and preheat oven to 400 degrees.  Put beets in a roasting pan and cover with foil.  Roast until tender, about 1 hour.  When cool enough to handle, peel beets and cut into eighths,  then transfer to a bowl.  Melt butter with horseradish, syrup, vinegar, salt, and pepper in a heavy skillet over moderate heat.  Stir in beets and boil, stirring occasionally, until liquid in skillet is reduced to about 1/4 c. and beets are coated, 4 to 5 min.

Chocolate Beet Cake
Adapted from MACSAC's Asparagus to Zucchini
Makes 10 servings

2 c. granulated sugar (or xylitol)
2 c. flour
1/2 t. salt
2 t. baking powder
1 t. baking soda
3-4 oz. unsweetened chocolate
4 large eggs
1/4 c. oil (or 2 T. applesauce + 2 T. oil)
3 c. shredded beets (raw or roasted)

Heat oven to 325 degrees.  Grease two 9-inch cake pans.  Whisk dry ingredients together. Melt chocolate very slowly over low heat or in double boiler.  Cool chocolate; blend thoroughly with eggs and oil.  Combine flour mixture with chocolate mixture, alternating with the beets.  Pour into pans.  Bake until fork can be removed from center cleanly, 40-50 min.

Note: Eat plain, dust with powdered sugar, or decorate with your favorite icing.  I like to prepare a basic white buttercream and toss in a freshly cut raw beet to create a pink color.  Remove the beet chunk before frosting.


So, once we've eaten all that cake, we need some exercise, right?  I used to be like that, but now I figure it all evens out.  But speaking of exercise, I have to share my bicycling experiences lately.  I've been on a kick since Bike to Work Week (a couple posts ago).  One of the most practical gifts we received when we were trying not to accumulate too much baby "stuff" almost two years was a bike trailer.  Ben and I were just appreciating it the other night as we biked to get ice cream--we've vowed that we can only go out for Babe's (where the owner told us we were officially regulars) if we bike to get it.  It's great for doing errands that are slightly out of walking distance.  We have a Chariot--not that I'm trying to sell a certain brand--that can double as a stroller if you buy that attachment.  This thing got us through the cold, icy winter months because it has an attached plastic cover to keep Vera out of the elements.  It kept us sane, especially in January and February because we could get out for a walk most days.  And though we don't use it as much in the summer as a stroller (b/c its size can be cumbersome), it came in handy today when I wanted to walk a big grocery trip, which included picking up a bag of charcoal.  It's a double so if I buckle Vera to one side, she can ride shotgun with the hardwood (only if it's being used just as a stroller...this is not recommended in bike mode.)  I packed everything else into the huge back pouch and the area beneath the passenger's feet (again, only if you're strolling).  When we requested this item on our registry, we opted for the double even if there would only be one kid b/c Ben figured he could tote his cooler (of who knows what) in the other seat.  It's come in handy for that and much more.  I'm absolutely not an advocate of having all the boatloads of baby "gear" (to put it nicely), but if you're trying to get around the city without a car and you have a kid or two, I highly recommend a bike trailer.  For me, it's a great way to get from point A to point B AND get some exercise, which is a challenge for a busy mama.