...Growing, Building, Cooking, Preserving, Crafting...

2006 began our urban homestead when I broke ground on a garden, which now includes perennial fruits, flowers, & many vegetable varieties. We dream of solar panels, keeping bees and hens. Until then we'll continue growing and preserving our own fruits and vegetables, building what we can for our home, cooking from scratch, and crafting most days.

9.25.2010

Fall Events...Chilly Weather...and Comfort Food

I'm in the thick of preparations for next weekend.  I don't believe I've mentioned it yet, but on Friday, Oct. 1, I am preparing "A Soulful Meal with Anna Lappe" to kick off the weekend's Nourishing Community, Creating Sustainability event at the Unitarian Universalist Church West in Brookfield.  Then Saturday afternoon, Oct. 2, I've been asked to set up a booth in the Homegrown Village at Farm Aid 25: Growing Hope for America, where I will focus on food preservation within a display of our urban homestead.  I'm very excited to share a booth with my friends from the Victory Garden Initiative!

"Combing the berries"
Aside from event preparations, I've finished planting the fall garden--lots of lettuce, mesclun, mustard greens, cilantro, spinach, and more beets.  Some of the mustards are already popping up.  I've also finished processing all the elderberries we picked last weekend.  I laid them out in the basement on Tues. so they could get a little air circulation before I had time to pick through them.  Then I used a wide-toothed comb (purchased just for this purpose) to pick the berries off the stems.  Not only does this expedite the process, but it keeps your hands from getting so stained from the juice (though lemon or lime juice is good for removal.)  Earlier this week I made three quarts of elderberry syrup, which we'll take daily as a supplement to chase away winter colds and flu.  Tonight I finished bottling the elderberry cordial--using random glass bottles I'd saved, I have 1 gallon (two empty growler jugs) and another liter (the empty brandy bottle after using it to make the liqueur).  These will all store well at room temperature in the basement and can, in fact, improve with age.  Good thing, b/c we'll be drinking it through the next decade there's so much (actually, I see this as a strong bartering tool for the future.)  I can already picture us sipping a little of this liqueur on a cold winter night, to celebrate the holidays, or as an ingredient in a new cocktail on which I'll have to start working.  
Bubbling and gurgling elderberries


This week was also about comfort food--maybe because the weather started getting quite chilly.  Last weekend's ham turned into this week's ham loaf.  I haven't always been a fan of ground ham.  In fact, even when I worked at Sanford and Sandy D'Amato's dad, Sam, would fix his famous ham salad and share with the whole staff, I just couldn't stomach it.  But I've turned a corner and now I quite enjoy this sweet-salty comfort food.  

Ham Loaf
Serves 8

Adapted from Like Grandma Used to Make

1 1/2 lbs. ground cooked ham (I chop it in the food processor)
1 lb. lean ground prok
3/4 c. crushed graham crackers (I like to use half breadcrumbs so it's not quite so sweet)
1/2 c. whole milk
1/4 c. shredded carrot (you can easily shred/chop both carrots and onion in the food processor)
1/4 c. finely chopped onion 
1/4 t. black pepper
2 large eggs, lightly beaten
1/2 c. ketchup
1/4 c. firmly packed brown sugar
2 T. vinegar
1/2 t. onion powder

Preheat the oven to 350 degrees F.  In a large bowl, mix the ground ham, ground pork, crackers, milk, carrot, onion, pepper, eggs.  In a shallow baking pan, shape the meat mixture into a 9x5-inch loaf.  Smooth the top.  Bake for 1 hour.  Drain off any fat.  Meanwhile, in a small bowl, combine ketchup, brown sugar, vinegar, and onion powder.  Spoon half of the mixture over the meat loaf.  Bake for 15 to 30 min. more or until center registers at 170 degrees F on a meat thermometer.  Serve with remaining ketchup mixture.  

Green veggies for mac 'n cheese
I also made macaroni and cheese and snuck some extra veggies in there for Vera's sake.  I'm always feeling like she gets (and enjoys) more fruits than vegetables so sometimes I try disguising the veggies because anything green remains a challenge for her to eat.  This macaroni, even when reheated as leftovers, was nice and creamy.  

"Green" Macaroni and Cheese
Serves 12 (great as leftovers for the week)

Adapted from a recipe from Martha Stewart Living magazine.  I made it gluten-free and have made those notes at the end of the recipe.  Use the food processor to easily grate whole blocks of cheese.

1 stick unsalted butter, plus more for greasing dish
*6 slices bread, pulsed into crumbs in the food processor

1 small zucchini, ends trimmed
3-4 kale leaves, torn apart (middle vein left in)
1/2 red bell pepper, cut into quarters
5 1/2 c. whole milk
*1/2 c. all-purpose flour
2 t. salt
1/4 t. freshly ground nutmeg
1/4 t. ground black pepper
1/4 t. cayenne pepper, or to taste
4 1/2 c. (about 18 oz.) cheese--I recommend mixture of blue, cheddar, and muenster; grated
1 1/4 c. (about 5 oz.) freshly grated parmesan cheese
*1 lb. pasta (shells, elbow macaroni, penne, etc.), cooked 2-3 min. less than directions, drained and rinsed under cold water

Heat oven to 375 degrees F.  Butter a 3-quart casserole dish; set aside.  Place bread crumbs in bowl, melt 2 T. butter and pour over bread crumbs, toss; set aside.  In the food processor, fitted with the blade attachment, pulse the vegetables until well chopped; set aside.  In medium saucepan over medium heat, warm milk.  Melt remaining 6 T. butter in small stock pot over medium heat.  When butter bubbles, add flour.  Cook, stirring, 30 sec. Add chopped vegetables and cook 1 min.  While whisking, slowly pour in hot milk.  Continue cooking, whisking constantly, until mixture bubbles and becomes thick.  Remove pan from heat.  Stir in salt, spices, 3 c. cheese mixture, and 1 c. parmesan cheese; set cheese sauce aside. Stir pasta into reserved cheese sauce.  Pour into prepared dish.  Sprinkle with remaining 1 1/2 c. cheese mixture, 1/4 c. parmesan, and bread crumbs over top.  Bake until browned on top, about 30 min.  Transfer dish to wire rack to cool 5 min.; serve.

*For gluten-free option:  
For bread crumbs, substitute dehydrated vegetables (pre-made mixtures are sold in natural food stores) and pulse until finely ground in a food processor.  For all-purpose flour, sub. some type of gluten-free flour (sorghum, garbanzo, brown rice, etc.)  For pasta, sub. gluten-free pasta.  I was very impressed with how it held up in the leftovers; there was no texture difference.

9.19.2010

Visiting Another Urban Homestead

Our lone ear of ornamental corn--for grinding into meal
I had a beautiful experience visiting another urban homestead on Saturday. Someone posted a message on the Transition Milwaukee Yahoo Group last week about elderberries that he wasn't planning to harvest; he offered them to anyone willing to pick.  I jumped at the opportunity, thinking I'd be able to harvest enough to make some elderberry syrup to fight winter colds and flu.  Vera and I drove down to South Milwaukee yesterday to find the most amazing cottage garden/medicinal herb and flower garden/vegetable garden/urban homestead.  I was in complete awe of the beauty on this lot and three-quarters with its birds and butterflies, pawpaw and persimmon trees, goldfish pond with edible water plants (cattail, arrowhead, wild rice), willow branch fences, hazelnut trees, raised bed vegetable gardens with swale pathways, and a stone patio for taking it all in.  Owners Bryce and Debbie, fellow Transitioners who I first met on this day, warmly welcomed us; Bryce held my attention with details of his permaculture-influenced homestead developed over 30-something of experience.  He rattled off websites and latin names that I frantically tried to memorize as well as ideas for making a echinacea tincture.  When asked why I don't publicize my blog more, I respond that there are people out there doing far more than I--some for many more years than I've even been around.  This guy is one of those.  I'm kicking myself for not taking my camera, but I hope to keep the mental picture with me at least until I plan my garden next season.  After a tour I got busy clipping the clusters of dark elderberries weighing down a tall tree in the rear of the yard.  I harvested as much as I could reach, coming up with a full bushel.  There were probably two or three times as many hanging higher.  Afterwards Bryce and Debbie invited us inside; Vera played with their cat, O'Malley, while we continued our conversation and Bryce and Debbie pulled out old beat-up cookbooks and scratched down recipes (reminiscent of my grandmother's doing so for me) for making elderberry syrup and cordial with this trove of berries.  We were there probably two hours and I left with the sweet smell of the garden and pleasant thoughts of this kind couple in my head.  It reminded me of freelance stories I've written when I had no idea I was about to interview someone who'd give me a new, inspiring perspective on life.  Afterwards I'd always let out a big sigh, think about how I could use this knowledge for the best, then savor every bit of the wonderful conversation.  Hopefully we can visit the Ruddock's again in their beautiful garden.  In the meantime I've got loads of elderberries to process.

Saturday night I decided to bake a ham.  It wasn't a local ham, but one that I'd had in the freezer from Ben's Easter "bonus" last spring.  I love to prepare a ham on a weekend then eat from it all week--breakfast meat, sandwiches, split pea soup with ham, and the newly beloved ham loaf (stay tuned for this recipe later in the week).  When I think of sweet, smoked ham, the side dish that often comes to mind is corn.  I found a recipe for Country-Style Scalloped Corn in a cookbook that remains from the days I worked for my dad and "peddlers" would come around to his office--one of them selling cookbooks.  Many of the pages are falling out, but it lives on.  Below is the recipe I adapted to make it more local and a bit healthier.

Scalloped Corn, Edamame, and Kale
Serves 6

Adapted from Like Grandma Used to Make (Reader's Digest books)


1 T. butter
1 large yellow onion, chopped
1 stalk celery, finely chopped
2 large eggs, lightly beaten
1 T. flax meal
1 c. crushed crackers (I used crushed dehydrated veggies I had in the pantry--carrots, gr. beans, etc.)
3/4 c. whole milk
1/4 c. diced red pepper
1 t. dry mustard
1/2 t. salt
1/8 t. ground cayenne pepper
6 oz. fresh or frozen local corn (off the cob)
6 oz. fresh of frozen edamame (or other beans--soaked and cooked)
6 oz. fresh kale, chopped in the food processor (including center vein)
6 oz. shredded cheddar
1 T. butter, melted

Preheat oven to 350 degrees F.  In a small saucepan, melt 1 T. butter over medium heat.  Add onion and celery, cook 5 min. or until tender.  In medium-size bowl, combine eggs, 1/2 c. crushed crackers, milk, peppers, mustard, salt, and cayenne.  Stir in onion mixture, corn, edamame, kale, and cheese.  Pour into lightly greased 1 1/2-qt. casserole.  In a small bowl, stir together remaining 1/2 c. crushed crackers and 1 T. melted butter.  Sprinkle over corn mixture.  Bake for 30-35 min. or until knife inserted comes out clean.

Today, as planned, we had a couple of friends and their toddler up from Chicago to share Sunday brunch.  We've been trying to host Sunday dinners at least every 6-8 weeks around here, but due to work schedules for Monday (not to mention sleeping schedules for children), we decided to make an earlier time.  I was thrilled because I'd always wanted to host brunch--so many great recipes to try, but never enough weekend breakfasts together for the opportunity.  We planned the food, our friends brought the Bloody Mary fixin's (complete with my homemade dilly beans and pickles, and local cheese whips), which we enjoyed towards the beginning of brunch, of course, so as not to hinder those driving later in the evening.  I was determined not to buy anything for the brunch so I thought hard about what we could make using in-house ingredients.  Turns out I bought a couple small melons and some fall raspberries at the South Shore Farmers' Market on Saturday, but otherwise we eeked out a well-rounded meal without making a grocery trip:


Beet/Carrot Juice
Balsamic Tossed Baby Mustard Greens w/ LUH Cherry Tomatoes
Fruit Salad w/ Grapes, and Local Melon and Raspberries
Baked Ham
Savory Corn and Squash Pancakes w/ Homemade Salsa, Whole Milk Yogurt Garnish
Fresh Squeezed LUH Beet and Carrot Juice
Lemon and Lemon Balm Cupcakes w/ Lemon Glaze

In case you're interested, here are a couple of recipes for the aforementioned dishes.

Savory Corn and Squash Pancakes
Makes 8-10 large pancakes

Adapted from a recipe from "Taste the Season" at the Fondy Farmers' Market

3 large eggs
Our Sunday Brunch plates
1 T. flax meal
4 c. grated summer squash
1 c. fresh or frozen corn kernels (cut from 2 ears)
1/4 c. chopped green onions, tops included
1/2 red bell pepper, seeded and chopped
1/3 c. grated parmesan cheese
1/2 c. grated sharp cheddar cheese
1/2 c. brown rice flour
2 T. olive oil
1/2 t. black pepper
1 t. salt
High-heat oil for pan-frying (I prefer grapeseed oil)
Tomato Salsa
Whole Milk Yogurt (or sour cream) 

In a large bowl, beat eggs.  Beat in squash, corn, green onion, bell pepper, cheeses, flour, olive oil, salt and pepper.  Heat 2 T. grapeseed oil in a large skillet or on a flat-top grill over medium-high heat.  For small cakes, spoon 2 T. squash mixture per cake into hot oil and flatten to uniform thickness.  For large cakes, use 4 T. of squash mixture per cake.  Do not crowd skillet.  Leave about 1" between cakes.  Cook until edges turn golden brown, turn and cook other side until golden brown, about 3 min. total cooking time per cake.  Transfer to paper towel lined plate.  Place in warm oven and continue cooking remaining cakes.  Serve with salsa and yogurt (sour cream) garnish.

Lemon and Lemon Balm Cupcakes
Makes 12 cupcakes

I've tried to turn these into fairly "healthy" cupcakes.  The whole wheat flour gives them a denser texture than traditional fluffy cupcakes, but the sweet glaze makes you forget the difference.

1/2 c. unsalted butter, softened at room temp.
2 eggs, room temp.
1 3/4 c. whole wheat pastry flour
1/4 c. finely chopped fresh lemon balm
1 1/2 t. baking powder
1/2 t. salt
1 c. xylitol
1 1/2 t. all-natural lemon extract
1/2 t. vanilla extract
2/3 c. milk (soy, almond, cow's, etc.)
1 t. dried lemon peel
3 T. lemon juice
Silicone baking cups
1 recipe lemon glaze

Glaze:

1 c. powdered sugar
Lemon Juice--enough for spreading consistency


Line muffin cups with silicone or paper baking cups, or grease thoroughly and bake without cups.  In medium bowl, combine pastry flour, lemon balm, baking powder, and salt; set aside.  Preheat oven to 350 degrees F.  In large mixing bowl, beat butter on medium-high for 30 sec.  Add xylitol, lemon extract, vanilla.  Beat on medium-high 2 min. until light and fluffy, scraping bowl.  Add eggs, one at a time, beating well after each addition.  Alternately add flour mixture and milk to butter mixture; beat on low after each just until combined.  Stir in lemon peel and lemon juice.  Spoon batter into prepared cups. Bake 22-25 min., until wooden skewer inserted comes out clean.  Cook in muffin cups on rack 5 min.  Remove from pan; cool completely.  Spoon Lemon Glaze over cupcakes in a criss-cross pattern.  

I made a point of not writing a to-do list for today (though Ben received one while I was out this morning.)  It felt great.  Felt like a Sunday should--after brunch we took a leisurely walk along the lakefront with our guests, shared dessert (then they left), cleaned up, watched some football (even if I don't care about football), then chose to write a blog entry tonight.  I also worked on editing and uploading photos of my sewing projects (for me this time, not Vera).  If you get a chance, check them out scattered on my Photo Gallery page.  These are from the past few years.  I love using thrifted fabric and patterns (most of which I scored from since-closed antique store off I-57 in Kankakee, IL--used to be on the way to my folks' house "down south.")  I've also had fun repurposing some discarded T-shirts.  Upcycling is fun!


9.17.2010

Adventures with Apples

My apple processing efforts this year have been ones of days-long deliberation over what exactly to do with them.  The apple butter took at least three days for me to cook, make the butter, then find time to can it.  The wild apples I picked last Sunday were no different.  They sat in the quarter bushel basket on my counter for a couple days looking beautiful, then I cooked them down and they sat in the pot another 2-3 days until I finally decided that I would NOT can them.  It's always a challenge to squeeze this homesteading activity in between Vera's naps (I don't like her playing in or passing through the kitchen when the kettle is boiling hot--and sometimes splashing out--within her reach...not to mention, canning usually requires my full attention and so does an 18-month-old.)  I knew I wouldn't get a huge amount of sauce from this harvest and probably wasn't going to get seconds from my favorite orchard (they're using all of this year's seconds to meet the demand for cider.)  It's more in line with my urban homesteading ideals anyway to use what's in our vicinity, so I think it's meant to be that I don't acquire more for sauce.  Making applesauce is most important to me for baking purposes (though Vera would beg to differ)--I sometimes substitute it for half the amount of oil in a recipe, which cuts back on my vegetable oil bill and adds another local ingredient to my baked goods.  So with the sauce I rendered, I portioned it into 1/4 and 1/2 cup amounts and froze it in muffin pans.  When these solidify, I'll put the portions into freezer bags then dole out what I need for baking...and Vera will probably get to eat some as well.  The following is my favorite recipe in which to use applesauce.  Perhaps you have zucchini surviving in your garden or see you'll see it at the next farmers' market.  We got a large one in our CSA box this week.  Shred and freeze the zukes to use this winter in zucchini bread--label the freezer bag(s) with the amount(s) called for in the recipe--or bake it today and enjoy this weekend.  I do some mad freezing of zucchini throughout the summer.  Once, Ben walked in the door right as I was furiously feeding these into the food processor and said "Whoa!" explaining that it was like the last scene from "Fargo" when the guy's feeding the body through the wood shredder.

Glazed Zucchini Bread
Makes one 9x5-inch or three 5 1/2x3-inch loaves

Adapted from The Bread Bible by Beth Hensperger


6 T. vegetable oil
6 T. applesauce
1 1/2 c. sugar (or xylitol)
3 large eggs
1 t. vanilla extract
2 c. grated zucchini
2 c. unbleached all-purpose flour
1 1/2 t. baking soda
1 t. baking powder
1/4 t. salt
1 t. ground cinnamon
1 t. ground cloves
1 c. (4 oz.) walnuts, chopped, or raisins (dark or golden), plumped and drained

Brandy Glaze:
1/4 c. sugar (or xylitol)
1/4 c. brandy or cognac

Preheat oven to 350 degrees F.  Grease and flour loaf pans.  In a medium bowl, using a whisk or electric mixer, combine oil and sugar.  Beat hard until light colored and creamy about 1 min.  Add eggs and vanilla and beat again until well combined.  Fold in grated zucchini and stir until evenly distributed.  In a large bowl, combine flour, baking soda, baking powder, salt, cinnamon, cloves, and walnuts or raisins.  Add zucchini-egg-mixture and stir to combine.  Beat just until batter is evenly combined and creamy in consistency, about 1 min.  Spoon batter into pan.  Place pan in center of oven; bake 65-75 min. for large loaf, 40-50 min. for small loaves, or until  tops are firm, loaves pull away from sides of pans and knife/skewer inserted into center comes out clean.  Let loaves stand in pan(s) 5 min.

To prepare glaze: Combine sugar and brandy in a small saucepan.  Cook over low heat just until sugar dissolves.  Set aside.  Pierce hot loaves, top to bottom with a bamboo skewer or metal cake tester about 10 times.  Pour on the warm glaze immediately.  Cool in pan 30 min. before removing to finish cooling on rack.  Wrap tightly in plastic wrap and refrigerate overnight before serving.

Spicy Dill Carrots
This week I achieved my goal of canning dilly carrots with our own carrots and hot peppers.  Just a few pints, but enough to accompany our dilly beans on a relish tray at our Sunday dinner parties.  I also spontaneously canned some onion and fennel relish using a fennel bulb from last week's CSA box.  Just a few jars of relish that could be processed for the same amount of time as the carrots, I was able to process a full batch in the kettle.

Onion and Fennel Relish
Makes 6 half-pints

2 lbs. large onions, peeled and cut into eighths
A 2-inch piece gingerroot, peeled and coarsely chopped
3 medium-sized fennel bulbs, trimmed, outer layer removed if discolored
1 t. fennel seeds
1 t. crushed dried rosemary
1/2 c. sugar (or xylitol)
1/2 c. rice wine vinegar or white wine vinegar
1/2 c. water
1 T. dried tarragon

In small batches, combine onion, ginger, and fennel in a food processor and pulse rapidly until finely chopped.  Transfer to large pot, add fennel seeds, rosemary, sugar, vinegar, and water, and bring to a boil over medium heat, stirring occasionally.  Cover, reduce heat, simmer 15 min.  Uncover, stir in tarragon, and cook until most of liquid has evaporated, about 15-20 min.  While relish is cooking, prepare jars, lids, and bands for canning.  Fill each jar with relish, leaving 1/4-inch headspace.  Pack relish into jars, remove air bubbles and wipe rims.  Place lids and rings on jars and process for 10 min. in a hot water bath canner.  Cool, check seals, label, and store.

I still haven't identified all of the wild berries I spotted on our foraging trip last Sunday so I e-mailed photos of these potential goodies to the foraging expert at the Urban Ecology Center, Matt Flower.  (With a name like that he's destined to study nature--kind of like my dad's college geology teacher, Dr. Lava or my college wine professor, Dr. Vine.  Reminds me of how our European ancestors earned their last names based on their trades.)  I'm hoping to get a response soon so I can return to the park to harvest.  I'm currently consulting my wild edible food guides and online resources to no avail.

It feels like it will be a chilly weekend.  I'm looking forward to planting more fall greens in the garden to accompany the arugula, beets, mustards, and lettuce I seeded on Wednesday.  Sunday we have plans to host some Chicago friends for Sunday brunch.  More details on that after the weekend.  Enjoy the weather!

9.13.2010

Fall Foraging


Highbush cranberry, wild apples, sumac berries

Sumac concentrate


My fall foraging adventures continued on Sunday.  I strapped Vera into the bike trailer and hit the trail for Sheridan Park where I'd harvested more wild edibles with my eyes on the way home from work on Friday.  We picked more wild apples--well, I picked them while Vera sat in the grass nibbling what we found--clipped staghorn sumac berries, and picked some samples of highbush cranberry, which I decided was better left for another month or so until it isn't quite so tart.  I will most likely cook the apples down into applesauce.  The sumac I "processed" today to make sumac concentrate.  Once you shake the debris off of four or five berry clusters, clip them off the stems and put them into a blender.  Fill the blender with water and puree until combined.  Let is sit for 30 min. or so then strain through cheesecloth.  Sumac has a lemony flavor; this concentrate can be turned into sumac-ade, which looks like pink lemonade, or it can be substituted for lemon juice.  I was thrilled to find this out not only because it's free, but because it's another local substitute for a food we receive from many miles away.  When I started my homesteading journal, one page was a brainstorm of currently used non-local ingredients that could either be eliminated from our diet or be replaced by something comparable that's locally grown.  Sumac concentrate fits the bill (now on to pawpaws instead of bananas...)  The highbush cranberries will hopefully be turned into cranberry sauce--plans for our Thanksgiving menu are developing and I think it would be awesome if everything came from within 100-200 miles of Milwaukee.

Our friend hoisting a bier!
Pigs on sticks
This weekend also found us enjoying the Oktoberfest festivities.  We danced--Vera and I found ourselves in a German "conga" line in front of the Alte Kameraden band--we had fun people watching--especially all those dressed in lederhosen and dirndls--and we savored some spit-roasted pork and chicken (Vera couldn't figure out why those little piggies were going round and round on that stick.) Oh, and we drank some good beer.

The garden continues to surprise us with its abundance.  This past week the potted variety of okra, Bubba, started producing "fruit."  I would definitely plant more next year.  I might reap enough for one pot of gumbo this season.  We're also excited about the huge loofah squash that seemed to appear overnight.  Upon finding it, I closely examined the rest of the sprawling vines and realized that all kinds of little squash are still growing.  If there are still enough warm days for them to mature, these could make great gifts alongside a  homemade herbal bath sachet or they could be fodder for bartering later.  I was just researching how to dry and whiten them.  This will be an exciting winter project.

Vera finds worms in the carrot bed
Today I harvested the rest of our carrots, washed and stored them in the depths of the fridge for the winter.  Soon our fridge will look like our farmer friends at Sandhill Organics who actually remove one of their fridge shelves for the winter to accommodate all the root vegetables stored there until spring.  The grand total is over 22 pounds, which should be enough carrots to last us all winter.  We usually buy three 5-pound bags of Tipi Produce carrots at the co-op throughout the winter, but I may not be needing them this year.  It's a small step towards self-sufficiency.

This week is about pickling for me.  I'm teaching a pickling class at the Urban Ecology Center on Tuesday and I'm hoping to preserve a batch of my favorite pickled carrots before the weekend.  Speaking of preserving (and shamelessly self-promoting while I'm at it), I was featured on the blog Haute Apple Pie today with some preserving tips.  Check out what these three modern homemakers are putting up this fall.

I've made my final garden list for the season and today I planted more fall seeds, which I will continue to do this week.  Though there is still a lot growing out back, it's hard not to think about it all winding down soon.  In the meantime, I'm enjoying this gorgeous sunny, slightly cool, not buggy weather we've been having.

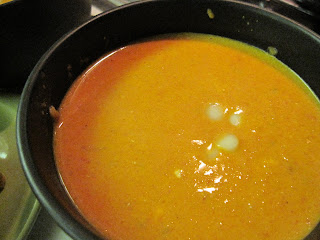
And I'll leave you with another tomato recipe for those nursing the dwindling supply of this late summer fruit.  We still have many red orbs practically falling off our plants and I've preserved as many as my pantry and freezer can currently hold.  This soup is fairly quick to prepare even an hour before dinner needs to be on the table.  Get creative with garnishes.

Curried Cream of Tomato Soup
Serves 3-4

2 T. unsalted butter
2 T. grapeseed oil
1/2 c. finely chopped onions or shallots
2 cloves garlic, minced
3 c. vegetable stock
3 c. fresh chopped tomatoes
1/2 c. sour cream
salt and pepper, to taste
1-2 t. red curry paste, diluted in water until easily stirred into the soup w/o clumping

Heat 1 T. butter and the oil in a soup pot over medium heat.  Add onions and garlic; saute until soft, about 3 min.  Add broth and tomatoes; bring to boil.  Lower heat and simmer, uncovered, 25 min., or until tomato mixture begins to thicken.  Remove from heat and process in 2 batches in blender until smooth.  Return to pot and heat over medium until warmed through.  Stir in sour cream, 1 T. butter, and diluted curry paste.  Season with salt and pepper to taste.

Note:  I garnished with diced mozzarella whips (like thinner string cheese), which softened slightly in the hot soup and tasted like the classic breaded mozzarella stix dipped in marinara.

9.10.2010

Preserving Like Crazy


This time of year reminds me of the fable about the ant and grasshopper--the ant works hard all summer to store food for the cold months while the grasshopper plays and wonders why the ant toils away.  In the depths of winter the grasshopper has no food and shows up at the ants' door begging for a handout.  Obviously, times are not quite like this now, but thinking about this story gives me motivation for putting up all the local food that we do during the growing season.  Some days I wish I could be more like the grasshopper and just hang out while it's warm.  I do that, but not enough.  My backyard lounge chair lacks the permanent imprint I was hoping to achieve this summer.  But there's still time!  Though these chillier days of fall make me want to forget about tending my pots of annuals and think about cleaning up the garden for winter "hibernation," I know there are still gorgeous days ahead, hopefully an Indian summer, and lots of relaxing on cool evenings.

Our first juicy canteloupe
I should stop talking about fall and winter and savor the flavors of these last summer days.  Let's talk melons.  This was the first year I tried growing watermelons and canteloupe; there's definitely room for improvement in 2011.  My trellis idea worked, though I believe the melon plants caught the mildew that slowly destroyed most of my other cucurbitae varieties.  So far they haven't sized up that well before falling off the vine.  We did enjoy a fairly sweet watermelon last weekend while we camped, but the canteloupe have a bit to be desired.  One neat thing that I learned about canteloupe was how they ripen on the outside. At first I had these green oblong things dangling from the trellis that didn't much resemble the canteloupes I know.  I watched them day by day and realized that as they ripen the "netting" gradually creeps over the fruit from one end to the other, making them look more familiar.  I will probably freeze our remaining melons in chunks and add them to a smoothie this winter.  The texture will be there even if the sweet flavor is lacking.
Milling out the seeds and skins from the apples

Canned plums
Mild tomato salsa
This past week found me preserving like crazy.  In fact, last night as we were cleaning up after dinner, Ben commented that the kitchen felt like it had been used intensely over the last few weeks (meaning--as my star dishwasher--he'd been using a lot of extra elbow grease to clean pots, pans, and the stovetop.)  As we conceive of our dream kitchen makeover I realize I need something extremely durable as well as easy to clean.  I might as well just install a commercial kitchen.  Ours has been used and abused lately.  But now I have a large batch of canned plums, a few jars of tomato salsa, and a nice sampling of wild apple butter (which ended up being a three day process as I tried to work it in between Vera's naps.)  Still on my list for this year is applesauce--pending a good harvest of seconds from the orchard I prefer--and spicy dill carrots (using our homegrown carrots and hot peppers).  I rearranged my pantry this week so that the canned fruits, pickles, tomatoes, and jams/jellies are all grouped together.  Before Wednesday it was just a mess of jars quickly placed on the shelves downstairs.  I'm preparing to make my pantry and freezer inventory spreadsheets, which help me keep track of what remains in both locations this year.  Especially with the freezer, it can be a challenge knowing what hides in the depths that could be added to the week's menu.

While I'm discussing canning, I want to share some new lids I've been using this year thanks to a lead from a colleague and former preserving student.  You may have heard that regular canning lids contain Bisphenol-A (BPA).  Even organically produced canned vegetables can contain this potential neurotoxin in their linings.  Another plus for home canning.  Tattler brand produces BPA-free canning lids and the best part is that they're reusable.  They make it slightly trickier to identify a sealed jar, but I've had no problem adjusting.  I recommend stocking up; consider it overhead in your canning process.  So far they're only available online, but maybe if we talk them up at our local grocery or co-op they'll start carrying them.

Elderberries
Elderberries w/ plain yogurt, fresh pear sauce
Unidentified wild black fruits
The late summer finds me continuing my search for wild edibles.  I was out the other day surveying the brushy lakefront path where I like to forage and came upon some elderberries (which never go without one of my husband's favorite quotes from Monty Python and the Holy Grail, "Your mother was a hamster and your father smelt of elderberries.")  We had just enough to add to our yogurt and granola this week.  I planted a couple of these trees/bushes in our yard this year so in the near future we'll have our own crop.  I also found some other wild blackish berries growing in tight clusters near the branches of the tree.  I took a picture and have been trying to line it up with something online to see if it's edible or not.  So far, no luck.  Anyone recognize it?

Another breath of life for a 3rd generation sock

The craftiness has been limited lately as we try to savor the remaining days of summer, but I've found that one of my projects from last year is finally coming in handy.  Before Vera was born I made a bunch of leg warmers for her out of old socks that had worn out in the heel or toe.  Her slender little legs could barely keep them on last year, but on those chilly days this past week I found they were perfect for pulling on over tights under a dress.  I love them!  I got this idea from my friend Beth who blogs at At The End of This Row who found them on another website, Goosie Girls.  I just wore out the heel on yet another pair of my favorite striped socks so instead of trying to darn them, which I can now easily do on my sewing machine, I will make another pair of leg warmers for Vera.  It's a very quick and inexpensive way to add a little style to her wardrobe (though as a very biased mother I think she'd look cute dressed in a paper sack.)

I'd like to share a few recipes that we've tried this week as I work on managing the fridge contents, once again.  Soon the only veggies in the refrigerator will be all our winter storage--roots, tubers, onions, squash, etc. so I should savor the abundance we'll have for a few weeks.

Spicy Vegetable Curry
Serves 4

Adapted from One Pot.


1 medium eggplant
8 oz. kohlrabi
12 oz. potatoes
8 oz. broccoli
8 oz. button mushrooms
1 large onion
3 carrots
6 T. butter
2 garlic cloves, minced
4 t. finely chopped fresh gingerroot
1-2 fresh green chiles, seeded and chopped
1 T. paprika
2 t. ground coriander
1 T. mild or medium curry powder
2 c. vegetable stock
1 lb. fresh tomatoes, chopped
salt
1 green bell pepper, seeded and sliced
1 T. cornstarch
2/3 c. coconut milk
2-3 T. ground almonds (almond meal)
Fresh cilantro sprigs, to garnish
Freshly cooked rice, to serve
Plain yogurt (my favorite garnish)

Cut eggplant, kohlrabi, and potatoes into 1/2-inch cubes.  Divide broccoli into small florets.  Button mushrooms can be used whole or sliced thickly.  Slice onion and carrots.  Heat butter in a large pan.  Add onion, kohlrabi, potatoes, and broccoli and cook over low heat, stirring frequently, for 3 min.  Add garlic, gingerroot, chiles, paprika, ground coriander, and curry powder and cook, stirring, 1 min.  Add stock, tomatoes, eggplant, and mushrooms and season with salt.  Cover and simmer, stirring occasionally, for 30 min. or until tender.  Add bell pepper and carrots, cover, and cook another 5 min.
Place cornstarch and coconut milk in a bowl, mix into smooth paste, and stir into vegetable mixture.  Add ground almonds and simmer, stirring constantly for 2 min.  Taste and adjust seasoning, if necessary.  Transfer to serving plates, garnish with cilantro sprigs, and serve immediately with rice.

This next recipe is great for Eat Local Challenge week because it not only uses local vegetables, but locally produced protein.  I prefer Simple Soyman tofu, made here in Milwaukee.  We used broccoli and scallions from our garden along with locally grown mushrooms.

Stir-Fried Sesame Broccoli
Serves 4

Adapted from Vegetarian Suppers from Deborah Madison's Kitchen


1 lb. firm tofu packed in water, drained
1 lb. or more broccoli
1/4 lb. green beans, trimmed and cut into 2-inch pieces
salt
6 T. soy sauce
4 t. toasted sesame oil
8 oz. button mushrooms, sliced
5 t. light sesame or grapeseed oil
1 1/2-inch knob of fresh ginger, peeled and minced
1 large garlic clove, minced
4 scallions, including greens, sliced diagonally
2 T. mirin or 1 1/2 T. light brown sugar
1/4 c. toasted sesame seeds
12 oz. asian noodles, cooked

Set tofu in a colander, put a heavy object on top and set aside.  Blanch broccoli and green beans for about 4 min., put into ice water bath for a few minutes then drain.  Remove tofu from under weight and slice into 3/4-inch cubes.  Put in a glass pie plate and toss with 2 T. soy sauce, 2 t. toasted sesame oil. When you're ready to eat, heat a wok or wide skillet over medium-high heat and add 2 t. light sesame oil.  When hot, add tofu.  Cook, without stirring until it begins to color, after a few min.  Turn the pieces to brown on all sides.  Add any remaining marinade from pie plate to glaze tofu, season with salt and set aside.  Rinse skillet.  Heat rest of light sesame oil.  Add ginger, garlic, and scallions and stir-fry for 30 seconds, then add mushrooms.  Cook 2-3 min., then add broccoli, green beans, and tofu.  Combine remaining soy sauce with mirin and pour it over vegetables.  When heated through, toss with toasted sesame seeds, drizzle with rest of the dark sesame oil, and serve over noodles.

I just found out last week that my parents will be joining us for Thanksgiving this year.  I'm so excited to cook dinner for the third year in a row.  I'm really getting the hang of brining and roasting the bird.  Speaking of which, if you want an organic heritage turkey, JenEhr Family Farm is taking orders now so they no how many birds to put on for the holiday.  They offer pickup at the West Allis Farmers' Market as well as at their farm in Sun Prairie, WI near Madison.  Order your turkey today!

9.06.2010

Eat Local Challenge


Monarch butterfly on thistle
Overlooking the prairie behind our campsite at dusk
The 2010 Eat Local Challenge began last Wednesday, the first of September.  I spent part of the day talking to people and handing out information on the ELC at the Westown Farmers' Market.  In the past two years, the challenge has expanded to celebrate two wonderful weeks of local food in early September.  What a perfect time to eat as locally as one can.  We usually go camping over Labor Day weekend so we took the challenge on the road.  We spent two days and three nights at Harrington Beach State Park, just a quick jaunt north along the lakeshore, where we were experienced a beautiful campsite overlooking a prairie, well-kept outbuildings and other facilities, and a gorgeous beach along Lake Michigan.  This was all a huge treat after the abomination we encountered at the Indiana Dunes State Park where we camped over Memorial Day weekend.
Wild apples

Local "lumberjack" breakfast
Our trove of windfall apples
The three of us woke early the first morning and lazied around in our sleeping bags in the tent--me reminiscing about the Holly Hobby sleeping bag I had as a kid, which Ben thinks is ironic because she was the prairie homesteader--then rose slowly and made breakfast--pancakes made with local sorghum flour, pastured pork bacon, the first edible watermelon from our garden, and some Milwaukee-roasted coffee.  It was brisk, yet gorgeous with blue skies and light winds so we grabbed our binoculars and took a birdwalk guided by the experts from the Milwaukee Audubon Society.  I'd been birding only once--on a winter trip to Kohler, WI--so this was great fun.  Of course, I was more interested in the wild edibles we passed along the trail--highbush cranberryelderberries, and wild apples--than the birds, which were so quick to flit here and there, I was barely able to catch the slightest glimpse by the time I got my oculars adjusted.  We learned from the birders that the site of this state park is "old fields," meaning old agricultural fields, which explains the sprinkling of apple trees throughout the landscape.  By the next afternoon I was dying to get out and climb one of these trees if necessary.  Instead, we managed to collect about 18 pounds of windfall apples of all shapes, sizes, colors, and quality from a few trees near Puckett's Pond.  For windfalls they weren't in bad shape.  Cooked them down when we got home today; I plan to make apple butter this week.  Besides our lumberjack breakfasts and eating off the trail we also enjoyed our standard foil dinner--whose ingredients were much easier to find locally now than in the spring when we last prepared it--and S'mores with Milwaukee-based Omanhene Chocolate.

Foil dinner before cooking
Foil Dinner

Aluminum foil
Green Cabbage, torn into leaves
Carrots, washed and chopped
Potatoes, washed and chopped
Onions, peeled and sliced
Ground Meat
Butter
Salt and Pepper

Spread out a large piece of aluminum foil and build your dinner: a layer of cabbage, carrots, potatoes, onions, raw ground meat in the middle, pat of butter, salt and pepper then keep building it in reverse.  Keep in mind that it builds up quickly so don't add too much to start.  Wrap it tightly in foil making sure there are no holes where the butter can seep out.  Toss it onto a campfire that has burned down to coals and let it cook for about 30 minutes.  Unwrap (be careful of the steam) and enjoy!