...Growing, Building, Cooking, Preserving, Crafting...

2006 began our urban homestead when I broke ground on a garden, which now includes perennial fruits, flowers, & many vegetable varieties. We dream of solar panels, keeping bees and hens. Until then we'll continue growing and preserving our own fruits and vegetables, building what we can for our home, cooking from scratch, and crafting most days.
Showing posts with label Cooking and Growing. Show all posts

5.25.2011

Spring Foraging

Wild Mustard
Garlic Mustard

I've been crawling around in the wild the last few days gathering edibles for preserving.  V and I went out early Saturday morning to hunt for ramps in the woods.  Two grocery bags loaded into the back of the bike trailer and we were ready to go.  Earlier this week I canned pickled ramps and froze ramp confit.  I also prepared ramp soup and still have half a bag in the fridge to use fresh this week.


Pickled Ramps
Ramp Soup with Chive Yogurt (for the dairy-eaters)

Ramp Confit
This is the first season I've attempted to preserve dandelions, which will forever remind me of my childhood--not only rubbing the bloom's pollen on my arms and legs to make them yellow and blowing the seed heads, but also of my severe lack of interest in youth sports.  As my dad will tell you, when I was assigned to play outfield on the softball team I'd be out there squatting down picking flowers (probably dandelions) as a ball was coming.  "Annie, look up, catch the ball!" my dad would yell (or something to that extent) as he retold it, yet again, during his toast at our wedding reception.  Yesterday Vera and I ran around the park picking these prolific yellow weeds--a back-breaking task.  (If you choose to use dandelions for food make sure you pick them from an area not sprayed with pesticides.)  I thought V would be helpful because she's a bit shorter and wouldn't have to bend as far to pick the blooms.  She knows her colors so when I instructed her "just pick the yellow ones" I thought she'd have no problem and even a little fun.  Instead she carried the bag for a while then ran loose across the public lawn weedy with a carpet of creeping charlie among the dandelions.  We hopped back into the stroller and combed the lakefront until I pulled up all the garlic mustard I felt I could realistically process today.  I also found some wild mustards, which I may add to a salad or throw into my garlic mustard pesto (stay tuned.)  Today I made jelly out of the dandelions.  It's very rich so I will likely use it in small doses when the time comes.

Lavender-Infused Dandelion Preserves
Makes 3-1/2 pts.

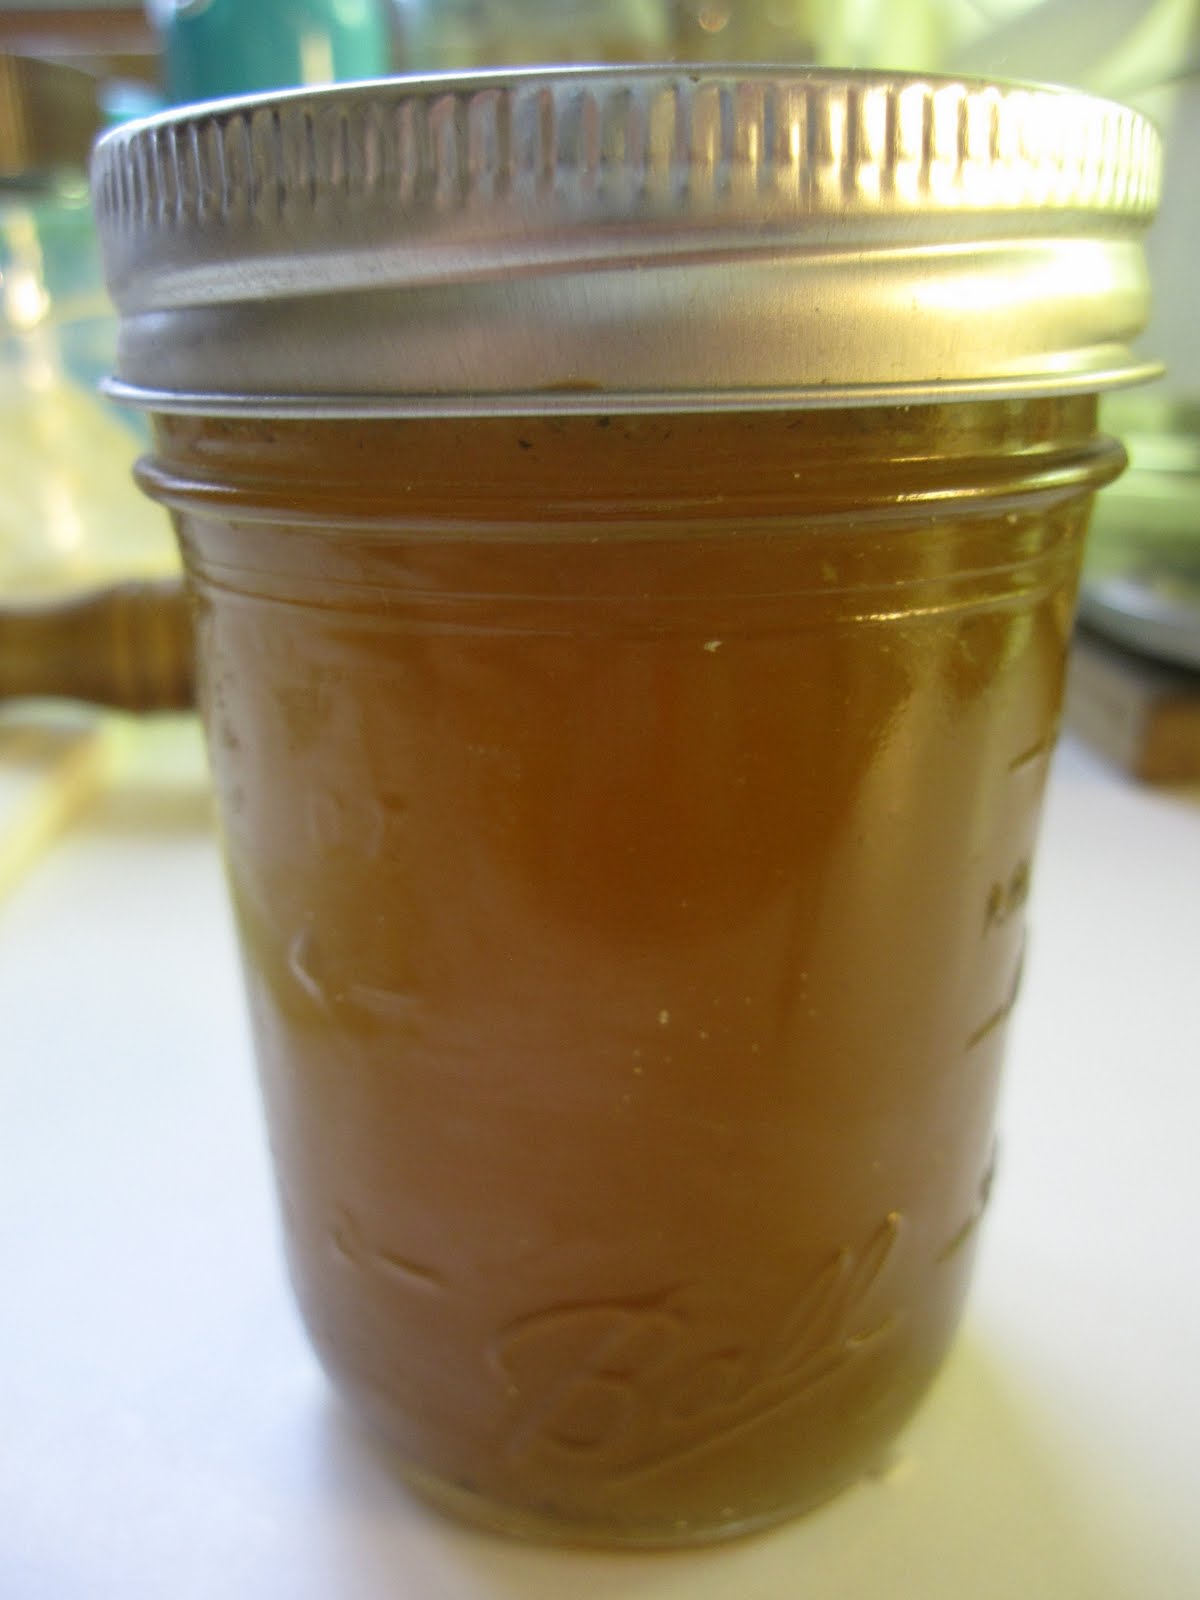
Lavender-Infused Dandelion Jelly
This jelly is as rich as honey.  If you want it to be more clear simply "infuse" your sweetener (sugar or xylitol) with lavender by adding a sprig or two of fresh lavender to a small container of sugar/xylitol and letting is sit for a month.  Remove the lavender and use the scented sweetener.


3 c. dandelion blossoms, separated from leaves and bracts
3 c. purified water
1 1/2 c. xylitol
1/2 T. dried lavender
1/4 t. vanilla extract
2 t. calcium water (comes with Pomona pectin)
1 T. lemon juice
3 t. Pomona's Universal Pectin

Boil flowers in water on medium heat for about 10 min.  In the meantime, add xylitol to food processor with vanilla and lavender, process until lavender is "dust" mixed into xylitol.  After petals have boiled, strain from liquid and return liquid to pot and add calcium water and lemon juice, bring to a boil.  In the meantime, to infused sugar, add pectin and stir to completely combine.  When dandelion "juice" is boiling, add xylitol/pectin and stir constantly for 2 min. to completely dissolve sweetener.  Return to boil then remove from heat.  Filter through small colander placed over jar-filler and fill warm, sterilized 1/2-pint jars with jelly, leaving 1/4-inch headspace.  Remove air bubbles, wipe rims, and cap with treated, sterilized lids.  Adjust screw bands and load into hot water bath canner.  Once canner is boiling, process jelly for 10 min.  Remove carefully and let cool at room temperature until completely cool.  Check seals.  Label and store.

Gray/"Silver" jacquard fabric
I've also had a chance to continue sewing this week.  Ben and I found some down time on Saturday afternoon while V was napping and I cut out a dress for myself and a 3T dress pattern for Vera.  I can't wait to finish the dress I'm making.  I've been in a gray and black stage for a while as I find it makes my pared-down wardrobe more versatile.  I'm continuing this personal trend with a gray jacquard fabric I found in my fabric cabinet--I believe I bought it at either an antique store or the antique flea market a couple of years ago.  With some creative pattern piece placement, I was able to s-q-u-e-e-z-e this dress out of the limited fabric I had.  We'll be attending a couple of weddings in the fall and I know at least one of them will be fairly elegant so I intend to get a couple of wears out of this outfit soon.  Just like my mom used to do--special event coming up, she'd make herself a new dress.  It feels great to sew something for myself--feels like it's been ages.

You may have heard that a temporary backyard hen ordinance has been passed in Milwaukee.  There will be a one-year trial period, which I think is a completely fair way to approach the project versus continuing to just shoot down the proposals after listening too much to the opponents.  Of course many people have contacted me wanting to know when I will have my chickens out back.  I honestly didn't see this happening so soon and therefore I've already planted my entire backyard with veggies, not leaving any room for a coop or run.  I'm interested in getting some beehives on our property first (next season) and am still running the chicken thing through my head considering my egg-free diet.  I'd likely be the one taking care of them and then not getting much out of it foodwise--of course there's the beautiful manure and the bartering possibilities.  But maybe I should wait until Vera's a little older and can help care for these critters and clean their house.  By then perhaps I'll have my dream garage rooftop garden and can give up more of my backyard growing space to some family pets.  For now I'll just live vicariously through a fellow craft blogger who keeps chickens in Madison.

I'd like to share a few snapshots of the spring garden to brighten up this dark, rainy spring day.  Can't wait to see how things bust out once the sun returns.

Radishes 
Salsify
Espalier Apple Tree (with weight)


Other Espalier Apple Tree (w/ garlic below)
Spinach from Coldframe
Red Lima Beans

11.11.2010

Making My Own Flour

Big Bag of Sunchokes
In the last month or so I've been trying to avoid gluten and generally cut back on carbs.  This has prompted me to consider alternative, especially gluten-free, flours.  I've learned that "flour" doesn't have to come from a grain, though it typically does.  There are low-carb, high-protein, high-fiber flours such as coconut, almond, and garbanzo that can be used in baking.  After further research of alternative flours I learned that there's also such a thing as "sunchoke flour."  A member of the sunflower family, sunchokes are also known as Jerusalem artichokes.  They are low-carb, high in inulin, native to our area, and they happen to grow in our garden.  (I say "they grow" instead of "I grow them" because they're perennial and completely self-proliferating.)  I don't have to do a thing but harvest.  I wrote about them back in the spring and noted that my neighbor had given me the first tubers to plant in my garden.  They've been extremely prolific since then.  As I worked to close the garden for the season this past week I cut the very tall stalks and dug up these "roots."  I'm sure I didn't get all of them--they can be quite elusive--but I ended up with nine pounds.  One can harvest them between October and April so perhaps I will find more in the spring when I prepare the soil for the garden again.  I washed and sliced them thinly, putting them into a pot of water with a little lemon juice to avoid discoloration while I sliced the rest.  I drained them then spread them on a few sheet trays and loaded them into my oven at a low temp. (175-200 degrees).  I found some information online about turning them into flour.  I chose not to peel them because A) it's an extremely tedious process and B) having worked with sunchokes before I know that the skin is completely edible though it adds a more earthy flavor and color.  I'm willing to adapt to that flavor in exchange for time saved on peeling.  One could also dry them in a dehydrator, which I do not have.  Stay tuned for the results.

"Midwest Capers"
I also finished my "local capers" this week.  I didn't reap many seed pods from my friends plot at the Hide House, but after a meeting earlier this week I found myself a block away from a restaurant at which I used to work (which has since closed) and knew they had nasturtiums growing in there planters outside.  I did some genuine urban foraging and helped myself to the seed pods that would otherwise go to waste.  I loaded my pockets then hopped on my bike for home to quickly get them brined.  I came up with about 3-1/4 pint jars, which should be plenty to take me through the year.

In another attempt to get more veggies into my daughter's and my family's meals, this week I prepared a split pea soup and added broccoli and bok choy.  She loved it and ate three (small) bowls for dinner that night.  Yay!


Split Pea Soup with Broccoli, Bok Choy, and Ham
Serves 5

Adapted from a recipe in 1000 Vegetarian Recipes by Carol Gelles.  It could certainly be made without the cruciferous vegetables.


Split Pea Soup with Broccoli, Bok Choy, and Ham
2 T. ghee or coconut oil
1 c. chopped onion
1 c. chopped carrots
3/4 c. green split peas
1/2 bunch bok choy, finely chopped in a food processor
4 c. water
2 c. vegetable stock
1 head broccoli, finely chopped in a food processor
2 cloves garlic, minced
3/4 c. fresh parsley, chopped
1-2 c. diced ham (I use leftovers)
Salt and pepper to taste (don't add too much salt before tasting after adding ham.)

Heat ghee or oil in a stockpot and add onions and carrots.  Saute a few minutes until soft.  Add green split peas and toss to coat with oil.  Add bok choy and water and bring to a boil.  Reduce heat and simmer, 1 hour.  Add vegetable stock, broccoli, garlic, and parsley.  Return to a boil.  Reduce heat and simmer, uncovered 30 min.  (Add more liquid if needed.)  Stir in ham and seasoning to taste.

9.06.2010

Eat Local Challenge


Monarch butterfly on thistle
Overlooking the prairie behind our campsite at dusk
The 2010 Eat Local Challenge began last Wednesday, the first of September.  I spent part of the day talking to people and handing out information on the ELC at the Westown Farmers' Market.  In the past two years, the challenge has expanded to celebrate two wonderful weeks of local food in early September.  What a perfect time to eat as locally as one can.  We usually go camping over Labor Day weekend so we took the challenge on the road.  We spent two days and three nights at Harrington Beach State Park, just a quick jaunt north along the lakeshore, where we were experienced a beautiful campsite overlooking a prairie, well-kept outbuildings and other facilities, and a gorgeous beach along Lake Michigan.  This was all a huge treat after the abomination we encountered at the Indiana Dunes State Park where we camped over Memorial Day weekend.
Wild apples

Local "lumberjack" breakfast
Our trove of windfall apples
The three of us woke early the first morning and lazied around in our sleeping bags in the tent--me reminiscing about the Holly Hobby sleeping bag I had as a kid, which Ben thinks is ironic because she was the prairie homesteader--then rose slowly and made breakfast--pancakes made with local sorghum flour, pastured pork bacon, the first edible watermelon from our garden, and some Milwaukee-roasted coffee.  It was brisk, yet gorgeous with blue skies and light winds so we grabbed our binoculars and took a birdwalk guided by the experts from the Milwaukee Audubon Society.  I'd been birding only once--on a winter trip to Kohler, WI--so this was great fun.  Of course, I was more interested in the wild edibles we passed along the trail--highbush cranberryelderberries, and wild apples--than the birds, which were so quick to flit here and there, I was barely able to catch the slightest glimpse by the time I got my oculars adjusted.  We learned from the birders that the site of this state park is "old fields," meaning old agricultural fields, which explains the sprinkling of apple trees throughout the landscape.  By the next afternoon I was dying to get out and climb one of these trees if necessary.  Instead, we managed to collect about 18 pounds of windfall apples of all shapes, sizes, colors, and quality from a few trees near Puckett's Pond.  For windfalls they weren't in bad shape.  Cooked them down when we got home today; I plan to make apple butter this week.  Besides our lumberjack breakfasts and eating off the trail we also enjoyed our standard foil dinner--whose ingredients were much easier to find locally now than in the spring when we last prepared it--and S'mores with Milwaukee-based Omanhene Chocolate.

Foil dinner before cooking
Foil Dinner

Aluminum foil
Green Cabbage, torn into leaves
Carrots, washed and chopped
Potatoes, washed and chopped
Onions, peeled and sliced
Ground Meat
Butter
Salt and Pepper

Spread out a large piece of aluminum foil and build your dinner: a layer of cabbage, carrots, potatoes, onions, raw ground meat in the middle, pat of butter, salt and pepper then keep building it in reverse.  Keep in mind that it builds up quickly so don't add too much to start.  Wrap it tightly in foil making sure there are no holes where the butter can seep out.  Toss it onto a campfire that has burned down to coals and let it cook for about 30 minutes.  Unwrap (be careful of the steam) and enjoy!

8.25.2010

Using the Summer Heat to Keep Cool

The Sun Oven in the final roasting phase

I'm starting to feel a bit of fall in the air, dare I say.  After the heat we've endured this summer I think I'm nearly ready.  But I don't want to wish the summer days away so in the meantime we'll do what we can to keep cool.  The other day I slow-cooked beets in the Sun Oven most of the day.  They were tender and the skins slipped off easily.  All without heating up the house, thank goodness.  I feel like the process of getting these beets on the table begins to define where I'd like to go with our urban homestead--we grew the beets using soil enriched with homemade compost, we cooked them by the sun's energy in our yard, and the trimmings went back into our compost, which will help grow more beautiful beets next year.  My dream is a closed loop.  I prepared one of my favorite beet recipes with these sun roasted treats.

Honey Mustard Beets
Serves 8

Adapted from Fresh Start by Julie Rosso.  I love to use fresh herbs as a "salad" so add more if you'd like.  The walnuts are a nice additional, but if you plan to eat this as leftovers you may want to add the walnuts at serving time, otherwise they may get soft.


8 c. large dice roasted beets
3/4 c. finely minced fresh chives
1/2 c. finely minced flat leaf parsley
2 T. plus 2 t. Dijon mustard
1/2 c. honey
4 t. balsamic vinegar
salt and pepper to taste
1/2 c. walnut pieces toasted, optional

In a large bowl, combine the beets, chives, and parsley.  In another bowl, combine the mustard, honey, and vinegar and stir until smooth.  Toss with the beet mixture to coat, then season with salt and pepper.  Sprinkle with walnuts if desired.  Enjoy immediately or set aside for 1-2 hours at room temperature to give the flavors more time to blend.

Homemade "Fish Sticks"
With this salad I prepared breaded pan-fried smelt or, what I like to call, "homemade fish sticks."  I used a three-step breading process with seasoned flour, egg (with a little water added), and homemade seasoned breadcrumbs.  When breading, remember to always dedicate one hand to handling wet and one to dry.  We rarely fry food in our house, but occasionally something begs to be pan-fried, such as these little fish.  Though they're lake fish, because they are small--therefore low on the food chain--they should be relatively low in toxins unlike many of our fish these days.  This may have been my first time enjoying smelt.  It was surprisingly delicious and not fishy at all.  Though I suppose if I breaded and deep-fried my shoe I'd also eat it.  No, really I recommend smelt.  I served them with a quick tartar sauce made from sour cream, horseradish sauce, and minced dill pickles.

Canned Whole Tomatoes
The past few days have also found me trying to manage this season's abundance of tomatoes.  It seems like we bring in one or two pounds every day.  I had given up on growing heirlooms because in our microclimate a couple blocks from the lake we never got enough consecutive warm days for ripening.  This year I planted early maturing varieties and just my luck it's been hot hot hot since June (maybe next year I'll try one or two heirloom plants again.) But the hybrids that I am carting into the house are perfect for canning whole tomatoes, making sauce, or drying.  So far I have just canned whole tomatoes, but I plan to make crushed toms also.  If you're canning tomatoes, please use a tested recipe and add acid (lemon juice) if canning them in a hot water bath canner.  Tomatoes, as is, fall on the borderline of needing to be canned under pressure versus hot water bath.  Be safe, not sorry!

Yesterday I started bringing in the carrot harvest for the year.  I planted Danvers Half Long (an heirloom variety), Tonda di Parigi (a Thumbelina variety planted between the rows of other to grow "on their shoulders"), and Merida (an overwinter storage carrot that we can mulch over and harvest through the snow).  These all grew well in my crusted soil.  Next year I will work in more compost and see if they do even better.  I have learned that it's easiest--though also messiest--to harvest carrots when the soil is wet.  Sprinkle the soil from a watering can to loosen the carrots and make them easy to pull out, in tact.  This project basically negated the shower I took yesterday morning.  Vera joined in and was a mess as well.  So far I've harvested just over 13 pounds of carrots from one raised bed and I've only tackled half of them.  I believe our garden will supply our whole winter's worth of carrots.  I usually buy about three Tipi Produce 5-pound bags of carrots throughout winter at the co-op, but this year I may not need to supplement.  I also believe that I may have grown enough onions to last through the cold months.  These are usually something I stock up on at the end of season farmers' markets and store in my basement.  I have a better storage shelf this year with more air circulation and am hoping that the onions I hung to cure in the greenhouse will now last downstairs until spring.
Cellar Storage Rack with shelves that slide out

Jar of dried lemongrass stalks
Another way we've been keeping cool this summer is with ice cream.  Ben and I are suckers for Babe's Ice Cream in our Bay View neighborhood.  As I've mentioned before we try to ride our bikes to get it.  Making ice cream at home is fairly easy if you have an ice cream maker, though it does take a bit of planning ahead mainly so that the churning insert is frozen solid before you proceed.  I love making herbal ice creams: basil, lavender, sage, thyme...I've even heard that garlic ice cream is amazing.  Below is my basic ice cream recipe.  It's another way to "preserve" herbs, though I hesitate to call it a preservation method in our house because the sweet frozen cream only lasts about three or four days tops.  I made Triple Lemon and Coriander Ice Cream with my garden's herbs and some locally grown lemongrass I dried last year.  The notes are below.


Basic Ice Cream
Steeping the herbs in half and half
Makes about 1½ qts.

3 c. half and half
5 large egg yolks
¾ c. sugar
pinch of salt
1 c. heavy whipping cream
1 t. vanilla extract
Optional 2-3 c. herbs (basil, lemon verbena, mint, thyme, etc.), stems removed

Heat half and half just to boiling. Meanwhile, separate eggs.  Whisk yolks, sugar, and salt in medium bowl.  If using herbs, steep 20 minutes, covered off the heat, after heating half and half. Add hot half and half to egg mixture in a steady stream, slowly.  Rinse saucepan but do not wipe out.  Return mixture to saucepan and cook over medium, stirring constantly until mixture coats back of spoon.  Do not boil.  Strain custard and mix in heavy cream and vanilla, until well combined.  Refrigerate until well chilled.  Churn according to ice cream machine’s directions.
Triple Lemon and Coriander Ice Cream


Triple Lemon and Coriander Flavor:
2 c. fresh lemon balm leaves, bruised
2-3 stalks of fresh or dried lemongrass stalks, chopped coarsely
1 t. dehydrated lemon peel
2 t. ground coriander


In the recipe above, add the lemon balm, lemongrass, and lemon peel where it calls for herbs.  Add the coriander with the heavy cream and vanilla. 


8.07.2010

The Dog Days of Summer

Vera "digging" the beach
We just returned from a Wegner family vacation to Myrtle Beach, South Carolina.  Hot hot hot!  Good food, good family times, lots of relaxing.  Ben and I always enjoy checking out the "local color" when we make these trips; the jaunt via rental car from the Florence, SC airport to MB provided another opportunity.  We took in all the local sites as we crept down the highly-trafficked main highway--the South's requisite slew of Waffle Houses including a local knock-off called "Mr. Waffles," Thorny's Steakhouse and Saloon ("Home of the 80 oz. Steak Challenge"), Dolly Parton's Dixie Stampede, and lots of little roadside stands selling sweet potatoes, pecans, and watermelons (which we managed to sample--Mmmm!)  The week consisted of beach time, pool time, personal time, and lots of home-cooked meals back at our villa.  It's enjoyable to cook on vacation because there aren't a million other duties simultaneously staring me in the face.

Jumbo picking cucumbers
Lots of cherry tomatoes
Now it's back to reality.  Upon our return we found out it hadn't rained all week, but the vegetable garden and yard were still a jungle.  I fought the mosquitoes even midday to harvest green beans and tomatoes among other veggies.  My watermelon trellis collapsed (as expected) under the weight of at least three fast-growing melons; my potted pumpkin plant succumbed to powdery mildew which is quickly taking over my summer squash and zucchini, and our grapevines have now grown into a beautiful arch over the side gate.  Wow!  The critters seem to have enjoyed our hiatus as well--the aforementioned "skeeters" were as big as chipmunks, the chipmunks as big as squirrels, and the squirrels probably all passed out under our neighbors' deck with bellies full of cherry toms and my fall cabbage seedlings (which were doing fine before I left, but have now vanished).  I had green beans as big as pickling cukes, pickling cukes sized up like zucchini, and zucchini the size of baseball bats (these will be shredded and frozen for winter quick breads.)  Pounds and pounds of vegetables rolled through the backdoor today and there's more work to do tomorrow.  Might not be what one wants to face right after a week's vacation, but the advantage is that even though the fridge was empty from last week's clean-out, I had my own grocery store in the backyard.  Tonight I made a pot of ratatouille with the majority of the veggies coming from our garden.


Ratatouille
Serves 4-6

Adapted from 1000 Vegetarian Recipes by Carol Gelles.  If you don't have the right amount of zucchini or summer squash, you can sub. some combination of either.  Also, with a recently empty fridge, I didn't have tomato paste so I subbed organic ketchup then left out the sugar.


2 T. olive oil
2 c. chopped onions
3 cloves garlic, minced
4 c. diced eggplant
1 c. red bell pepper chunks
1/2 c. green bell pepper chunks
3 c. tomato wedges
2 c. sliced zucchini
1 c. sliced yellow squash
1/3 c. chopped fresh parsley
1/4 c. red wine
2 T. tomato paste
1 t. sugar
1 t. dried basil (or 2 t. fresh, chopped)
1/2 t. dried rosemary, crumbled
1/4 t. dried thyme
1/4 t. dried sage
2 t. red wine vinegar
1/2 t. salt, or to taste
1/8 t. pepper

In a 6-quart pot, heat the oil over medium-high heat.  Add the onions and garlic; cook stirring until softened, about 2 min.  Add the eggplant and bell peppers; cook, stirring, until softened, about 4 min.  Add the tomatoes, zucchini, summer squash, parsley, wine, tomato paste, sugar, herbs.  Bring to a boil.  Reduce heat to simmer, uncovered, 25 min., stirring occasionally.  Add the vinegar, salt, and pepper, simmer 5 min. longer.  Serve over rice, pasta, or polenta.

Depending on our energy levels tomorrow, we may venture out to the Wisconsin State Fair.  It's been year's since I've attended, but this year I scored a free ticket and I think Vera would enjoy expanding her repertoire of farm animal sounds (so far most animals are called "moos.")  I also have a strange curiosity about this season's new Food on a Stick.  I'm still waiting to see if they can produce deep-fried cigarettes on a stick, but with the state's new smoking ban, they may have missed the boat on what could have been a very popular idea.  Anyway, I'm also excited to check out the Horticulture, Crafts, and Culinary Pavilion, no surprise.  I'm anticipating a flashback to my days as an Edgar County, Illinois Pine Grove Ag. 4-H'er and baking or crafting for the judges each summer.  Stay tuned.