...Growing, Building, Cooking, Preserving, Crafting...

2006 began our urban homestead when I broke ground on a garden, which now includes perennial fruits, flowers, & many vegetable varieties. We dream of solar panels, keeping bees and hens. Until then we'll continue growing and preserving our own fruits and vegetables, building what we can for our home, cooking from scratch, and crafting most days.

8.18.2010

Enjoying the Summer Harvest


One of the many dragonflies that have "landed" in Milwaukee.
Ingredients for Cherry Lemonade
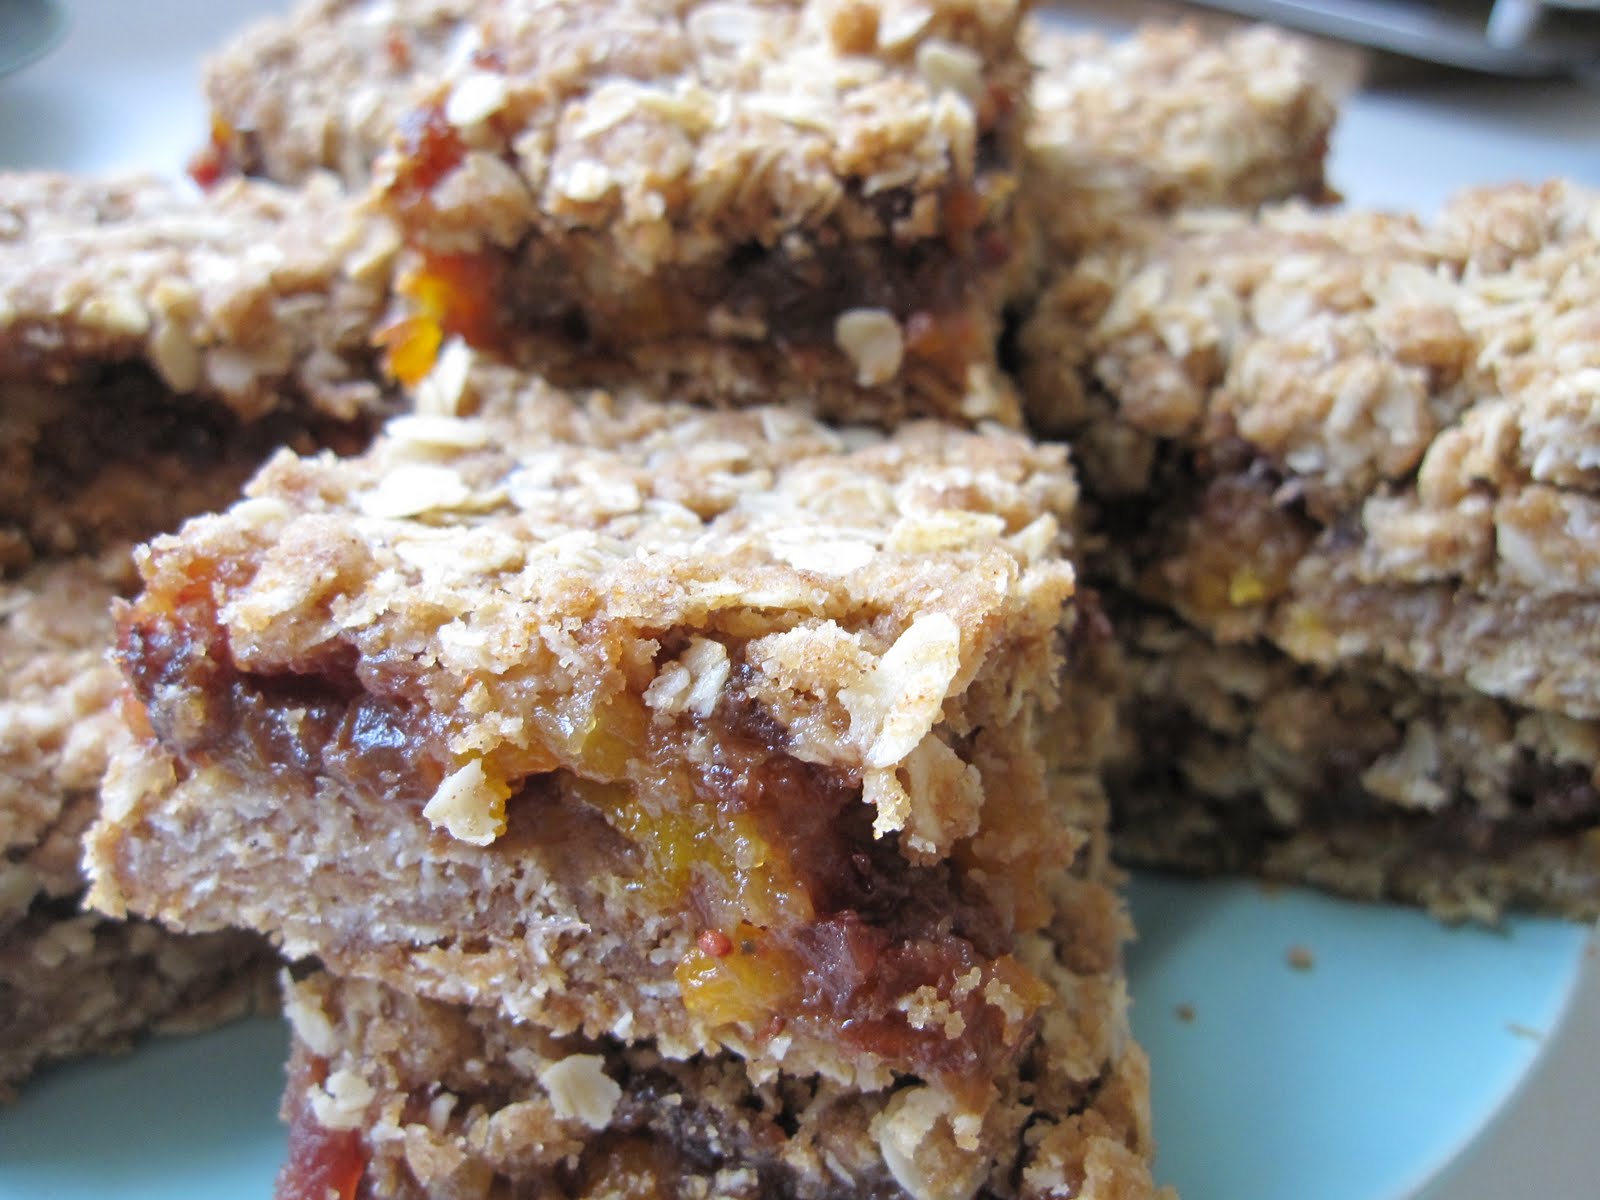
Today we had a visit from my cousin (and her family) from Roanoke, Virginia.  It was a mid-afternoon get together so I wanted to prepare some light refreshments.  I love the cooler weather we've been having because it's much more comfortable for spontaneous baking.  I prepared some simple Cherry Lemonade Spritzers with about 2 oz. cherry "syrup" poured off of my canned sweet cherries, 6 oz. lemonade (purchased or freshly squeezed), and 3-4 oz. of sparkling water.  You can adjust the recipe to your tastes; this is just a starting point.  I also cut up some juicy sweet Door County peaches I picked up at the farmers' market over the weekend and baked fruit crumble bars.  These bars could be made with any local fruits you may dry this season--cherries, cranberries, apricots, peaches, apples, etc.  I had raisins, dried Wisconsin cranberries, apricots, and dates on hand and used 1 c. of each.  I also used Wisconsin-milled Oly's oats.

Fruit Crumble Bars
Makes about 1 dozen large bars

Adapted from Afternoon Delights by McNair and Moore.

4 c. dried fruit
1/2 c. xylitol (or granulated sugar)
butter wrapper for greasing
3 c. old-fashioned rolled oats
1 1/2 c. all-purpose flour
1 c. firmly packed brown sugar
1 1/2 t. ground cinnamon
3/4 t. salt
3/4 t. baking soda
1 c. (2 sticks) unsalted butter, melted

In a saucepan, combine dried fruit, xylitol, and 2 c. water.  Place over medium heat and cook, stirring frequently, until fruit is plumped and tender and liquid is absorbed; cooking time will vary with type and dryness of fruit.  Remove from heat, spread on a sheet tray or plate to cool for a few minutes, then transfer fruit to a food processor and pulse a few times to puree coarsely.  Set aside.  Preheat oven to 350 degrees.  Grease a 9x13-inch baking pan with butter wrapper.  Set aside.  In a bowl, combine oats, flour, brown sugar, cinnamon, salt, and baking soda.  Stir to mix well.  Add butter and mix until well blended and crumbly.  Remove 2 c. of oat mixture and set aside.  Distribute remaining oat mixture in prepared pan and press gently to form even layer.  Spoon pureed fruit over layer and spread evenly.  Distribute reserved 2 c. oat mixture evenly over fruit and press gently to form top crust.  Bake about 30 min. or until surface is lightly browned.  Remove and cool on a wire rack then cut into 12 equal bars.  These can be stored at room temp. for up to 2 days.

I've also been trying to creatively use all the eggplants coming out of our garden.  This is one of the new vegetables I'm growing this year that I've really enjoyed so far.  It seems like every season I fall in love with a different vegetable--even ones that may seem ordinary--and have fun creating new recipes.  This one was adapted from a friend of mine.  The eggplant slices, filling, and tomato sauce can be prepared a day ahead, which came in handy for us during this busy week.

Rolled Stuffed Eggplant

Just out of the oven!
Serves 4-6

2 medium to large eggplants, peeled
1 beaten egg
½ c. milk
2 t. cooking oil plus more for cooking
1/8 t. salt
½ c. grated Parmesan cheese
½ c. ricotta cheese
2 T. chopped basil
Pepper to taste
Fresh tomato sauce (see recipe that follows)

Cut eggplant lengthwise into about 10 1/4-inch slices.  Place in a single layer on a sheet tray, sprinkle with salt and cover the layer with paper towel; repeat with remaining eggplant and let sit about 30 min. For batter combine egg, milk and 2 t. oil.  Add flour and salt; beat until smooth.  Dip eggplant slices into batter and cook on both sides in a small amount of hot oil until golden brown.  Drain on paper towels.  Combine Parmesan, ricotta, parsley, and pepper.  Place 1 T. of cheese mixture in the center of each eggplant slice; roll up jelly-roll style.  Place seam side down in baking dish (or hold with a toothpick if you feel more comfortable).  Bake in 400 degree oven for 25 minutes or until heated through; broil on high another 3 minutes.  Serve eggplant rolls with warm tomato sauce and additional Parmesan if desired.


Fresh Tomato Sauce


This recipe is very flexible; the amounts are up to you depending how thick and seasoned you like it.  You can also add any end pieces of eggplant not suitable for rolling; dice these medium.


Fresh tomatoes, cored and diced large
Fresh or dried basil and oregano
Fresh or granulated garlic
salt and pepper to taste


Combine everything but salt and pepper in a saucepan and cook down to your desired thickness.  Season to taste.


Although this is still the height of the summer season, I am planning for fall preserving and storage.  This week I harvested dried beans from my rattlesnake bean trellis.  This is the first year I've let them fully dry on the vine.  So far I have one pint, but there are many more beans still on the trellis.  One goal for next year is to add more bean trellises.  It's nice knowing that if it really came down to it I could grow my own protein and perhaps get all the nutrients I need from my own small parcel.  I also picked sage, air-dried it for at least a week on a sheet tray then ground it up in my spice grinder (coffee grinder dedicated to grinding herbs and spices) and laid it out to dry further.  If you save sage this way, be sure to fully dry it after grinding.  Last year I stored it immediately after and it molded, but I nearly put it into a Thanksgiving dish because the mold was not visible (same color as the sage); it was the smell that gave it away almost too late.
Homegrown "rubbed" sage
Over the weekend I was busy canning two cases of dilly beans for friend and former co-worker, David Swanson of Braise.  In the summer, preserving is like a natural, weekly activity for me--like doing laundry.  Pretty soon I'm going to need a production kitchen.  

8.12.2010

Up to the Ears in Zucchini

I have heard stories of zucchini plants being so prolific that gardeners in rural areas leave the abundance in neighbors' mailboxes or unlocked cars on the road.  I have not had that problem this year because my zucchini plants have a serious case of powdery mildew which is quickly destroying them.  But our CSA has had another bumper crop of summer squash; I've come up with a few recipes to tackle the load.  This stuffed squash recipe also works on the grill as we found out tonight--not wanting to heat up the house anymore than necessary on this of many hot days.  We used our homemade bulk Italian sausage, but you could easily leave out the meat.

Stuffed Yellow Squash
Serves 4

Adapted from 1000 Vegetarian Recipes by Carol Gelles (yes, I am one to adapt a veggie recipe to include a substantial amount of meat!)


2 large yellow squash (about 12 oz. each)
8 oz. pork sausage, cooked, reserve the grease or use 2 t. vegetable oil
1/2 c. chopped red or green bell peppers
1/4 c. chopped onions
1 clove garlic, minced or 2 garlic scapes, chopped
1/3 c. fresh corn kernels (if cut off the cob, save the cob for making soup stock)
1/4 c. plain bread crumbs
2 T. fresh parsley, chopped
2 T. fresh dill, chopped
salt and pepper, to taste

Preheat oven to 350 degrees or heat up grill.  Cut the squash in half lengthwise and scoop out the centers, leaving shells 1/2-inch thick.  Chop the scooped-out flesh.  In a medium skillet, heat the oil over medium-high heat.  Add chopped squash, peppers, onions, garlic; cook, stirring, until softened, about 3 min.  Stir in the corn, bread crumbs, herbs, salt and pepper.  Spoon 1/4 of the filling into each half squash.  Wrap each half in foil.  Place on baking sheet and bake 20 min.--or grill for the same amount of time--until squash shells are tender.

Traditional Bread and Butter Pickles
Today I was able to sneak in a couple small batches of preserves while Vera played.  I canned bread and butter pickles and blueberry juice.  I am so excited that all the cucumbers I've pickled this season have been right from our own garden.  I also got my hands on a case of Michigan blueberries (I temporarily gave up growing my own a couple years ago when I realized I couldn't achieve the delicate soil pH required for these berries) so continued my quest to can our own juices.  At the co-op on Monday I was looking at the ingredient lists on the brands of juices I usually buy.  Even with organic juices you will see "natural flavor" listed on the labels, albeit last.  According to Eric Schlosser, author of Fast Food Nation natural flavors are still man-made additives and not much more healthful than artificial flavors despite what most people think.  I'm finding that making my own juice is the only way to avoid even the most innocuous sounding additive.  After extracting the juice from the blueberries, I had a colander full of what I like to call "mush" that looked almost like blueberry pie filling.  I probably could have made this into jam, but decided to follow my instinct and freeze it for using in pies, cobblers, or maybe bread pudding this winter.
Blueberry "Mush"
Pint of Blueberry Juice
Now is the time of the season when our compost starts getting very full outside.  I was taking out the kitchen compost tonight before dinner and realized that nothing makes me feel like an "urban farm girl" more than running outside in my vintage apron, dumping the waste into the turner, and taking a couple hard pulls on the barrel before heading back inside to finish cooking.  As I've mentioned in the past, our compost should ideally be in two separate bins outside so that part of it has a fair chance to completely break down, especially so that it's ready to spread in the fall, which I have yet to manage before it snows.  We've found that a compost activator is necessary and has, in fact, sped up the process.

8.11.2010

Gimme a B-L-T!

We wait all year for homegrown tomatoes so we can make a simple BLT sandwich.  To me, that's a piece of heaven.  I usually throw caution to the wind and buy white bread for this, but today I was trying to use what I had in-house so we went with the standard whole-grain.  With locally produced thick-sliced bacon, tomatoes from our yard, and local Bibb lettuce it was fine, but I jazzed it up some homemade cilantro mayo made with local eggs, and some avocado slices--obviously not locally grown, but a current staple in our house as they're good brain-food for Vera.  Add a side of fresh, juicy seasonal canteloupe and that's a meal for me.

Onions hanging to cure in the greenhouse

Today I fought the mosquitoes--already thick at 7:30 AM--to plant some new garden seeds.  One of the challenges of growing throughout the season--my rural farmer friends nod in agreement--is succession planting.  Once something is picked or completely pulled, one plants the next crop in its place so there is always something to harvest.  This is especially important if you're trying to utilize a small plot of land such as our urban lot.  In this case, I'd harvested my onions and hung them to cure in the greenhouse so I tilled the soil (with Vera's help, as you can see) and in their place I planted fall beets and rutabaga.  And in the raised bed that was late to be installed I replanted napa cabbage, turnips, and cilantro.  My cabbages were sizing up nicely before our trip, but when I got back they'd been eaten to shreds by bugs.  I'll have to protect these better.

8.09.2010

Are You Going to Wisconsin State Fair? Parsley, Sage...

"Daddy, Daddy, can I get a chicken?!"

Polish Chicken
Buff Brahma Chicken
"Really, do you have to?"
Ben and Vera made their inaugural visits to the Wisconsin State Fair on Sunday afternoon.  It was fun for all; I can't believe I hadn't attended in several years.  It was a scene, as you might expect--kids on leashes, lots of "state fair hair," and the aroma of grease floating on the breeze--but we managed to see everything we wanted.  We checked out the livestock barns where Vera had a nice close look at what could be her only pet some day--chickens!  I was obsessed with the beautiful coloring and feathers on many of these birds.  She also checked out the ducks, geese, "bunnies," sheep, "moos," and horses.  While passing through the horse barn I actually ran into someone from my hometown--another Paris-ite (that's Paris, IL)--who was there showing his family's Clydesdales.  He let us "behind the scenes" to get a special look at one of them.  Vera was a bit spooked by such a huge animal.  State Fair foodwise I did not buy a cream puff, I did not sample any chocolate covered bacon, I did not try anything that came "on a stick," and I most certainly did not taste the cheesburger served on a Krispy Kreme doughnut.  Ugh!  The mere thought!!!  After watching a horse pull, and getting a few laughs out of the crazy products they're selling at the Expo Center, we capped it off with a stroll through the Horticulture, Crafts, and Culinary Pavilion.  I have hope!  There are still many many talented artisans out there handknitting, baking from scratch, and canning gorgeous preserves.  I would love to go back and spend a couple of hours examining the details of all these projects.  Impressive!  We also managed to sniff out some local food at the Wisconsin Products Pavilion--Ben tried a local bison burrito, Vera munched on a local apple and honey stick, while I savored a lamb gyro from my friends at Pinn-oak Ridge Farm in Delavan, WI.  Sure beats the Colossal Corn Dogs they were offering on the midway.
Whoa Horsey!
Wall of plants
I took a photo of this interesting wall of plants at the fairgrounds.  These aren't necessarily all vining, but they've been planted in such a way that they grow to look like they're climbing.  I wonder if I could incorporate this into our yard next year.  Maybe with some kind of veggies?

Black Raspberry Jam
Today it was truly back to reality after our vacation.  Everyone went back to "work."  I managed to squeak out a small batch of wild black raspberry jam while Vera napped.  With what I foraged I had 6 cups of berries--enough for 3 1/2 half-pints.  A couple for us to try and at least one for Ben to take on his annual Fall Classic canoe trip with his buddies where he always make a point of exploiting my homemaker skills with his assigned food items.  That's okay, I know they'll enjoy it.

I came up with an interesting raw salad today based on what's pouring out of the garden and our CSA farm right now.  This is a sort of slaw that could be made with kohlrabi or green cabbage.

Kohlrabi and Rhubarb Slaw
Serves 8

One could also add oil to the dressing mixture.  Sliced apples can be substituted for rhubarb.

3 small kohlrabi, peeled
2 green onions, chopped
3 salad turnips
1 stalk celery
3 stalks rhubarb, trimmed
2 T. lemon juice
3 T. fresh parsley, chopped
2 T. balsamic vinegar
1/4 c. walnuts
salt and pepper to taste

Cut the kohlrabi and turnips into chunks that can fit through the shoot of a food processor fitted with a shredder blade.  Shred the kohlrabi and turnips and put into a large mixing bowl.  Change to a slicer plate and add the rhubarb and celery; add to the mixing bowl.   Combine the lemon juice, parsley, vinegar and whisk until blended.  Pour over kohlrabi mixture.  Add nuts, toss and season to taste.