...Growing, Building, Cooking, Preserving, Crafting...

2006 began our urban homestead when I broke ground on a garden, which now includes perennial fruits, flowers, & many vegetable varieties. We dream of solar panels, keeping bees and hens. Until then we'll continue growing and preserving our own fruits and vegetables, building what we can for our home, cooking from scratch, and crafting most days.

1.29.2011

Celebrating Winter

Winterfest! (And V wearing my homemade balaclava.)
It's been a slow news week here at the LUH.  Toward week's end I took up a few baking and crafting activities and finally have some ideas to share.  Lately I've been feeling like I haven't had much time to be creative.  I follow a few other blogs that are always inspirational to me (Food in JarsMade by Rachel, and At the End of This Row), but on the same note they make me wish I had more time to be crafty and, most importantly, take my time in the process.  I realize that I need to give myself a break because I'm in a stage right now while Vera is very young and still requires a lot of my attention and supervision.  (Not to mention I should savor this time as, I imagine, one day I'll wake up and wonder where my "baby" went.)  So in the meantime I'm stealing as much time as I can to plunk down at my sewing machine or meditate with a knitting project.  And I've been amazed by how long Vera will let me do that.  As long as we have numerous pairs of snow boots sitting around in the basement for her to put on and take off, I can get in a good 45 minutes to 1 hour at a time sewing.  V occasionally asks to sit on my lap and watch, which is precious when she's not trying to stick her fingers under the rapidly moving needle.  I completed a project this week that I'd been imagining for a while.  We are those people who wash and reuse plastic bags, especially zip lock style bags.  I've found that they only last so long before they bust or part of the zipper splits on the sides so I began cutting off the zippers and saving them for a project.  I got the idea for these reusable snack bags in a magazine I read and heard myself echoing my mother's famous words, "I can make that!"  So this week I gave it a shot.  This is my first draft, pre-prototype stage.  I realized that simply surging or machine blanket-stitching the edges instead of sewing right sides together then turning right-side out would make it easier to seal.  I also realized that if I chose that method then I would be better using a different fabric instead of this easily-fraying linen I had in my stash.  But I had to start somewhere and learn from my mistakes.


I also finally found time to use some of my homemade acorn flour.  I adapted this recipe to fit my bill--gluten-free, dairy-free, egg-free.  I was also able to use our foraged applesauce and topped off my baked muffin with some wild Queen Anne's Lace jelly.

Acorn Muffins
Makes 1 dozen

...with a dollop of QAL jelly
These muffins have a fairly fluffy consistency considering they are gluten-free.  They are still more crumbly than regular muffins, but just as delicious.

1/2 c. acorn flour
1/2 c. brown rice flour
1 c. all-purpose gluten-free flour
2 t. baking powder
3/4 t. baking soda
1 t. salt
1 T. egg replacer diluted in 4 T. water
1/4 c. honey
Fresh Muffins for the weekend
1/4 c. applesauce
1/4 c. ghee or coconut oil, melted
1 c. almond "buttermilk" (1 T. white vinegar in a measuring cup, topped off to 1 c. with almond milk)

Preheat oven to 375 degrees.  Grease a muffin pan with oil (or use silicone cake cups) and set aside.  Whisk dry ingredients in a large bowl.  Combine wet ingredients in a small bowl.  Whisk until combined.  Make a well in the center of the dry ingredients and pour in the wet, mixing until smooth.  Bake 20-30 min.  Cool slightly before eating.

"Mushka" the sled dog
Community Pies
To cap off our weekend and Ben's staycation week we celebrated a glorious winter Saturday by attending the Washington Park Urban Ecology Center's Winterfest.  It was the second round of Community Pie's efforts to bake underutilized fruits into delicious pies for all to enjoy.  This time we served pumpkin pie, pumpkin apple pie, and various permutations of pear, apple, and cranberry pie.  After the sweets ran out Ben, Vera, and I took to the outdoors and had fun sliding around on the ice, sledding, and meeting the Door County Sled Dogs.  Too bad Vera wasn't watching to see the bus full of "puppies" arrive.  (Two of her favorite things to point out these days are school buses and dogs.)  It was adorable to see these pups with their noses sticking out the tops of the bus windows as we did with our hands and arms that earned us reprimand on grade school field trips.  Vera hung back from the puppies at first, but soon warmed up to them and was patting (make that poking) their fluffy coats and receiving lots of loving licks.   

1.21.2011

Fruit Leather

First attempt at Fruit Leather (a little dry)
I played with my new dehydrator this week and made a couple batches of plum fruit leather from local fruit I'd canned over the summer.  Ideally, I would not can then dehydrate fruit because I'd be wasting energy in one of those processes, but for experimentation sake I used what I had.  It was simple.  I dumped the jar of fruit and it's juice into the food processor, whizzed it until it was smooth then spread it onto a lightly oiled fruit leather tray and turned on the machine.  Following the manual's instructions for time and temperature it took about 6 hours to fully dry.  I need some practice to get the puree spread to the same thickness across the tray.  The thinner parts dried more quickly and were ready to crack and break by the time the thicker parts were fully dry.  In general, it's not bad.  Vera likes it so now we can take our local fruit on the go...especially in mommy's gym bag where it could possibly be forgotten for a day or two.

Wanted to add another winter recipe this week as well.  I tried this one in a slow cooker last year and had great success, but I prefer making it on the stovetop.

Moroccan Lamb and Fruit Stew
Serves 6-8

The original recipe calls for boneless leg of lamb or beef bottom round, which is probably why the slow cooker is a good idea.  I used lamb stew meat, which cooked quickly and was very tender.


Warm and Hearty Winter Food
1/4 t. crushed dried red pepper
3/4 t. ground turmeric
3/4 t. ground ginger
3/4 t. ground cinnamon
1/2 t. salt
2 lbs. lamb stew meat
2 T. coconut oil
2 large onions, chopped
3 cloves garlic, minced
16 oz. beef broth
1 c. pitted dates, snipped into 1/2-inch pieces
1 c. dried apricots, snipped into 1/2-inch pieces
Salt, to taste
Hot cooked couscous, brown rice, or [gluten-free] pasta
1/4 c. toasted slivered almonds

In a shallow mixing bowl, combine crushed red pepper, turmeric, ginger, cinnamon, and salt.  Coat meat with seasoning mixture.  In a dutch oven or small stockpot, heat oil over medium-high heat.  Brown meat.  Add onions and garlic and cook until soft.  Add broth.  Cover and cook over low heat about 1 hour.  Add dates and apricots; stir to combine and cook about 8-10 min.  Serve with starch of your choice and top with almonds.

1.17.2011

Sausage Making 101

Gramma 'Cille's handy old scale
When I told someone the other day that I was planning to spend my Saturday making sausage she asked where I learned how to do it.  I'd love to be able to say that I learned from my grandmother, or a hog farmer who processes his own meat, or that I picked up this skill on my last trip to Italy.  We spent a little time on charcuterie and meat processing when I was in culinary school, but I actually learned the most about this art by taking a Saturday continuing education class at Milwaukee Area Technical College called "Fundamentals of Sausage Making" (though I can't seem to find any current listings for this course...don't know if it's still being offered.)  I believe this is our fourth season making our own sausage.  We've typically set aside time for grinding and stuffing in November after all the other food processing is complete, but this year I couldn't find enough empty fridge space for the pork shoulder between our fall garden harvest and my holiday meats and poultry.  I always order a whole pork shoulder and pork fat from a local farmer.  The first year we made sausage, we excitedly tested 5-6 different recipes of cased meats.  Over the course of the next year we paid attention to and began to better understand our sausage needs; since then we've limited the variety to lots of bulk Italian sausage (for our Friday homemade pizza night) and Bratwurst.  This year we intended to smoke the bratwurst, but our timing did not allow.  We would need at least a full day following the sausage stuffing to keep an eye on the smoker (since we're meat smoking novices and don't yet trust ourselves to leave the premises during the process.)  Our schedule didn't allow so we simply froze the brats straight from stuffing.  Next year we'll reserve a whole weekend.


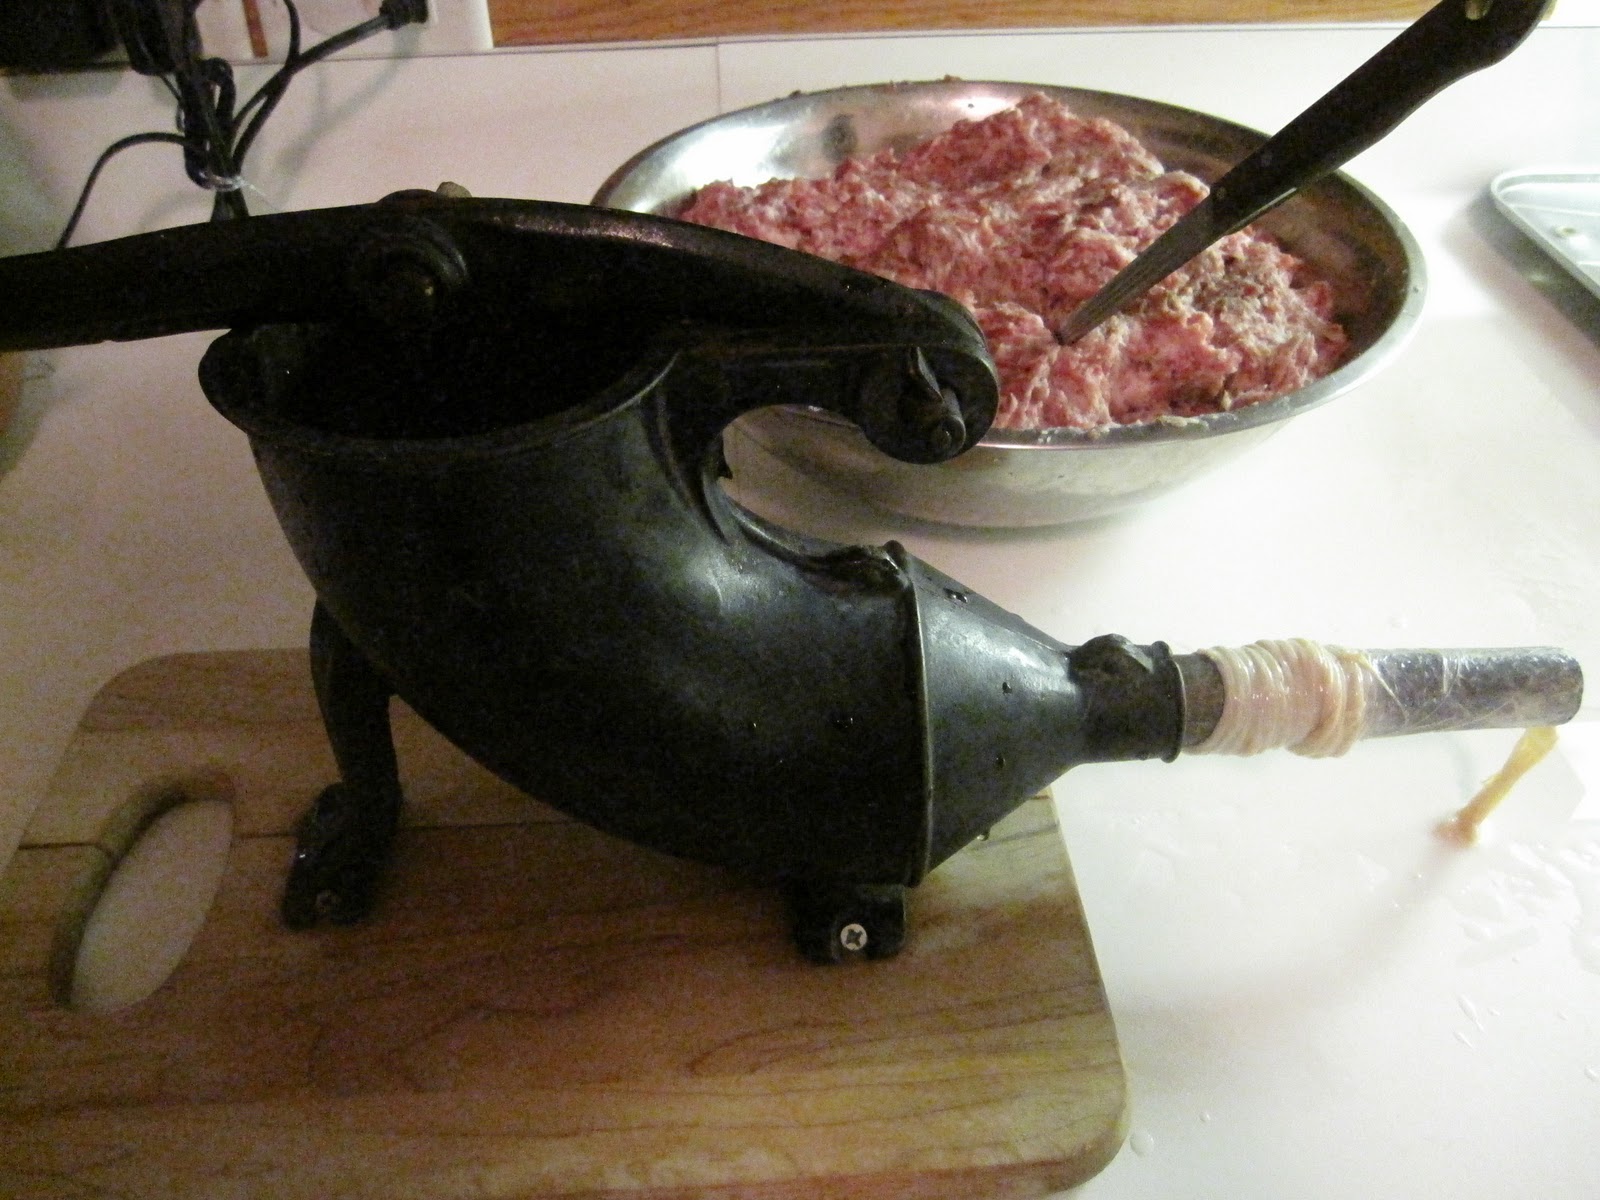
I use a grinder attachment on my Kitchenaid mixer to grind the meat.  You could certainly use a manual grinder.  You might also have success with a food processor.  We've realized that even when we use the smallest grinding plate, the consistency of the stuffed meat can still be too course.  Though a sausage stuffer attachment is also available for an electric mixer, we use a manual stuffer that was a gift from my mother-in-law.  This stuffer was salvaged from my husband's great grandmother's farm outside of Oil City in western Pennsylvania; on the side of the cast iron it says “Patented July 1858."  Every year when we make sausage we think of Granny (she was tough as nails, I hear) making her own cased meats in the old farmstead kitchen.  It took us a while to get the hang of using this stuffer and realize it was a two-person job.  The first season we had the stuffing tube in all the wrong places (there was no manual for this piece of equipment so we had to guess.)  But now we've got it down to a science--Ben loads the meat into the stuffer, I slip the casings onto the tube, he pushes the meat down and I gently guide the casings as they fill with meat then twist off the links and tie the ends.  Et voila!   

Smoked Bratwurst
Makes about 3 lbs.


The old stuffer with casings in place
2 1/2 lbs. pork butt, or 2 lbs. pork butt and 1/2 lb. beef chuck
*1/2 lb. pork back fat
1 T. kosher salt
1 T. coarsely ground black pepper
1 T. coarsely ground mustard seed
2 t. minced garlic
2 t. sugar
1 t. ground mace
1 t. dried sage
1/2 t. ground nutmeg
1/2 c. water
3/4 t. curing salts (optional...I don't add them)
**Medium hog casings

Stuffed!
Mix the meat, fat, salt, black pepper, mustard seeds, garlic, sugar, mace, sage, and nutmeg in a large bowl.  Grind the mixture through a 1/4-inch plate.  Add the water.  Add the curing salts, if you intend the cold smoke the sausages.  Knead and squeeze the mixture to blend all the ingredients thoroughly.  Stuff into medium hog casings, and tie in 5- to 6-inch links.  If you choose to cold smoke the brats and have mixed in the curing salts, air-dry the sausages in front of a fan overnight.  Cold smoke for 12 to 24 hours according to smoker directions.  Bratwurst can also be successfully hot smoked.  Hot smoke to an internal temperature of 155 to 160 degrees.  The smoked sausages will keep for 5 days refrigerated, or for at least 2 months frozen (though they last much longer for us if wrapped properly.)  Unsmoked sausages will keep for 3 days refrigerated.  


Italian Sweet Fennel Sausage
Makes about 4 lbs.  

Also from Bruce Aidells' Complete Sausage Book.  Stuff these into casings as well or freeze in small portions in bulk--I use an ice cream scoop and line a sheet tray with balls of raw meat, freeze then transfer to a labeled freezer bag.  


Ground Italian Sausage

3 lbs. pork butt
3/4 lb. pork back fat
1/2 c. dry red wine
4 garlic cloves, minced
2 T. fennel seeds
1 T. freshly ground black pepper
4 t. kosher salt
1 t. dried oregano
1/8 t. ground allspice
Medium hog casings (optional)

Grind the pork and fat together through a 3/8-inch plate.  In a large bowl. combine the pork and fat with the wine, garlic, fennel, black pepper, salt, oregano, and allspice.  Mix well with your hands.  Shape into patties, or stuff into casings and tie into 5-inch links.  The sausage will keep for 3 days in the refrigerator, or for at least 2 months in the freezer, if wrapped properly.

*When you order/purchase pork fat, be sure it's solid back fat.  This year, I didn't specify and was given a package of soft pork fat that was much more difficult--though not impossible--to incorporate into the ground meat.  

**Sausage casings, both natural and synthetic, as well as other meat processing tools and ingredients can be purchased at Haught Distributing in Menomonee Falls.

This was the main culinary event for the weekend, but since it went more smoothly than ever before, I still had energy to do some baking today.  I'm trying to perfect my gluten-free vegan baking skills.  I opt for vegan recipes because they leave out the dairy and eggs I can no longer eat.  Though I realized today that if I have access to lard (mostly in the case of pie or pastry crusts), I don't have to limit my recipes to those without animal products...but I guess I'm already straying from that because I use honey and gelatin here and there.  Anyway, my current project is to find a good gluten-free vegan brownie recipe.  I made a pumpkin brownie recipe last week that had a lot to be desired in terms of consistency.  I may revisit the ingredient list at some point, but today I tried something different and had great results (though I'm still striving for that characteristic crackled brownie crust.)

Vegan Blueberry Brownies
Makes about a dozen brownies

Adapted from a recipe on the blog Gluten-Free Goddess.  For the blueberries, I used the "mush" I had leftover and frozen from my blueberry juice making process.  You could certainly just use frozen or fresh and pureed whole blueberries.  These are nice and moist!  I believe they could be a hit even with the gluten-, dairy-, and egg-loving crowd.

1/2 c. coconut oil
1/2 c. gluten-free, dairy-free chocolate chips (I recommend Enjoy Life brand)
3/4 c. sorghum flour
1/4 c. potato starch
1/3 c. pure cocoa powder
1 t. gluten-free baking powder
1 t. sea salt
1 t. xanthan gum
1/2 c. xylitol
1/2 c. sucanat
1 1/2 t. egg replacer whisked with 2 T. warm water
2 t. gluten-free vanilla extract
1 T. maple syrup (or honey)
1/2 c. hot water
1 c. pureed blueberries

Preheat oven to 350 degrees.  Grease a square baking pan and set aside.  Melt coconut oil and chocolate chips in the top of a double boiler.  Whisking until incorporated.  Set aside.  Combine all ingredients--flour through sucanat--in a large mixing bowl.  Add diluted egg replacer, vanilla extract, syrup, and hot water.  Mix to combine.  Stir in blueberry puree and chocolate mixture and mix thoroughly.  Pour into prepared pan and bake 35 min. or until toothpick inserted in center comes out clean.  Let cool in pan.  Cut and enjoy.     

1.10.2011

Entertain Me!

Gift of Finest Citrus
Last night was it!  Our holiday entertaining is over.  We've officially hosted six meals--or significant food-centered events since Thanksgiving.  It was wonderful to share that time with friends and family.  We also became very well acquainted with all of our glassware, wedding china, and serving bowls/platters (none of which I impulsively picked up at thrift stores I feel guilty about anymore because it was put to such good use!)  I thoroughly enjoyed creating different menus, preparing local foods in the off-season, and having stimulating conversations with those who took part.  Admittedly, we're now exhausted.

We capped off our hosting streak with one of our semi-regular Sunday Dinners last night.  We hosted my two local cousins, their spouses, and one child.  They all live in the area, though I don't get to see or talk to them nearly enough.  Our grandparents have been gone for several years now and we've somehow become slightly unglued since the regular meeting place is no longer the same.  We have found others ways to keep in touch, though none are as genuine as face-to-face, especially over a meal--as my Gramma would have had it.  I largely overestimated my cousins' interest in the Packer game last night and was concerned that no one would want to miss it so we'd all be balancing plates on our laps in front of the television.  But everyone easily put that aside, we gathered around the dining room table, and lingered long after our plates were cleared.  It was the perfect finale to the season.  The meal I planned was flexible enough to be game time food (steadied on a knee) or served family style around the table.  It was very casual: Barbecue Pulled Pork as well as a Kumquat Garlic Chicken, Coleslaw, Herb-Roasted Potatoes, and--for my cousin whose only interest in veggies is off the cob--Buttered Corn.

Slow-Cooked Pork Barbecue (For Sandwiches)
Serves 8-10

BBQ Pulled-Pork over Coleslaw
I used an uncured ham roast, but you could use a shoulder roast as well.  I recommend serving leftovers on a bed of coleslaw (see recipe that follows) in the spirit of putting coleslaw on your pulled pork sandwich, minus the bun.


3+ lbs. bone-in pork roast
2 medium onions, sliced
2 cloves garlic, minced
1 c. barbecue sauce (your favorite recipe, or store-bought brand...gluten-free varieties are out there)
salt and pepper, to taste
Buns

Sear pork roast on all sides in a hot skillet coated with oil.  Transfer to slow cooker and cook with onions and garlic on high about 5 hours then low for 3-4 hours more until meat falls off the bone. The roast will create its own juice, no need to add liquid.  Remove from pot and pull meat off bone into a mixing bowl.  Add a bit of the juices, salt and pepper, barbecue sauce.  Serve on buns.

Coleslaw with Vinaigrette Dressing  
Serves 6-8

In late summer, I julienne and freeze the rest of my bell peppers.  If you've done so, this is a good place to use thawed red peppers.  


1 small green cabbage, cored and quartered (slice quarters to fit in feed tube of food processor, if using)
3 carrots, peeled
4 large radishes or golden beets, trimmed
1 stalk celery, trimmed
1 red bell pepper, diced
1/4 c. olive oil
6 T. cider vinegar
3/4 t. celery seeds
1 1/2 T. honey
Salt and pepper, to taste

Using the largest holes on a box grater or the slicer plate on a food processor, shred the green cabbage and put into mixing bowl.  If using food processor, switch to shredder plate now.  Shred carrots, radishes/beets, and celery and add to mixing bowl along with bell peppers.  In separate bowl, combine remaining ingredients.  Pour over cabbage mixture and toss to combine.  Season with additional salt and pepper to taste.

Kumquat Garlic Chicken
Serves 6-8

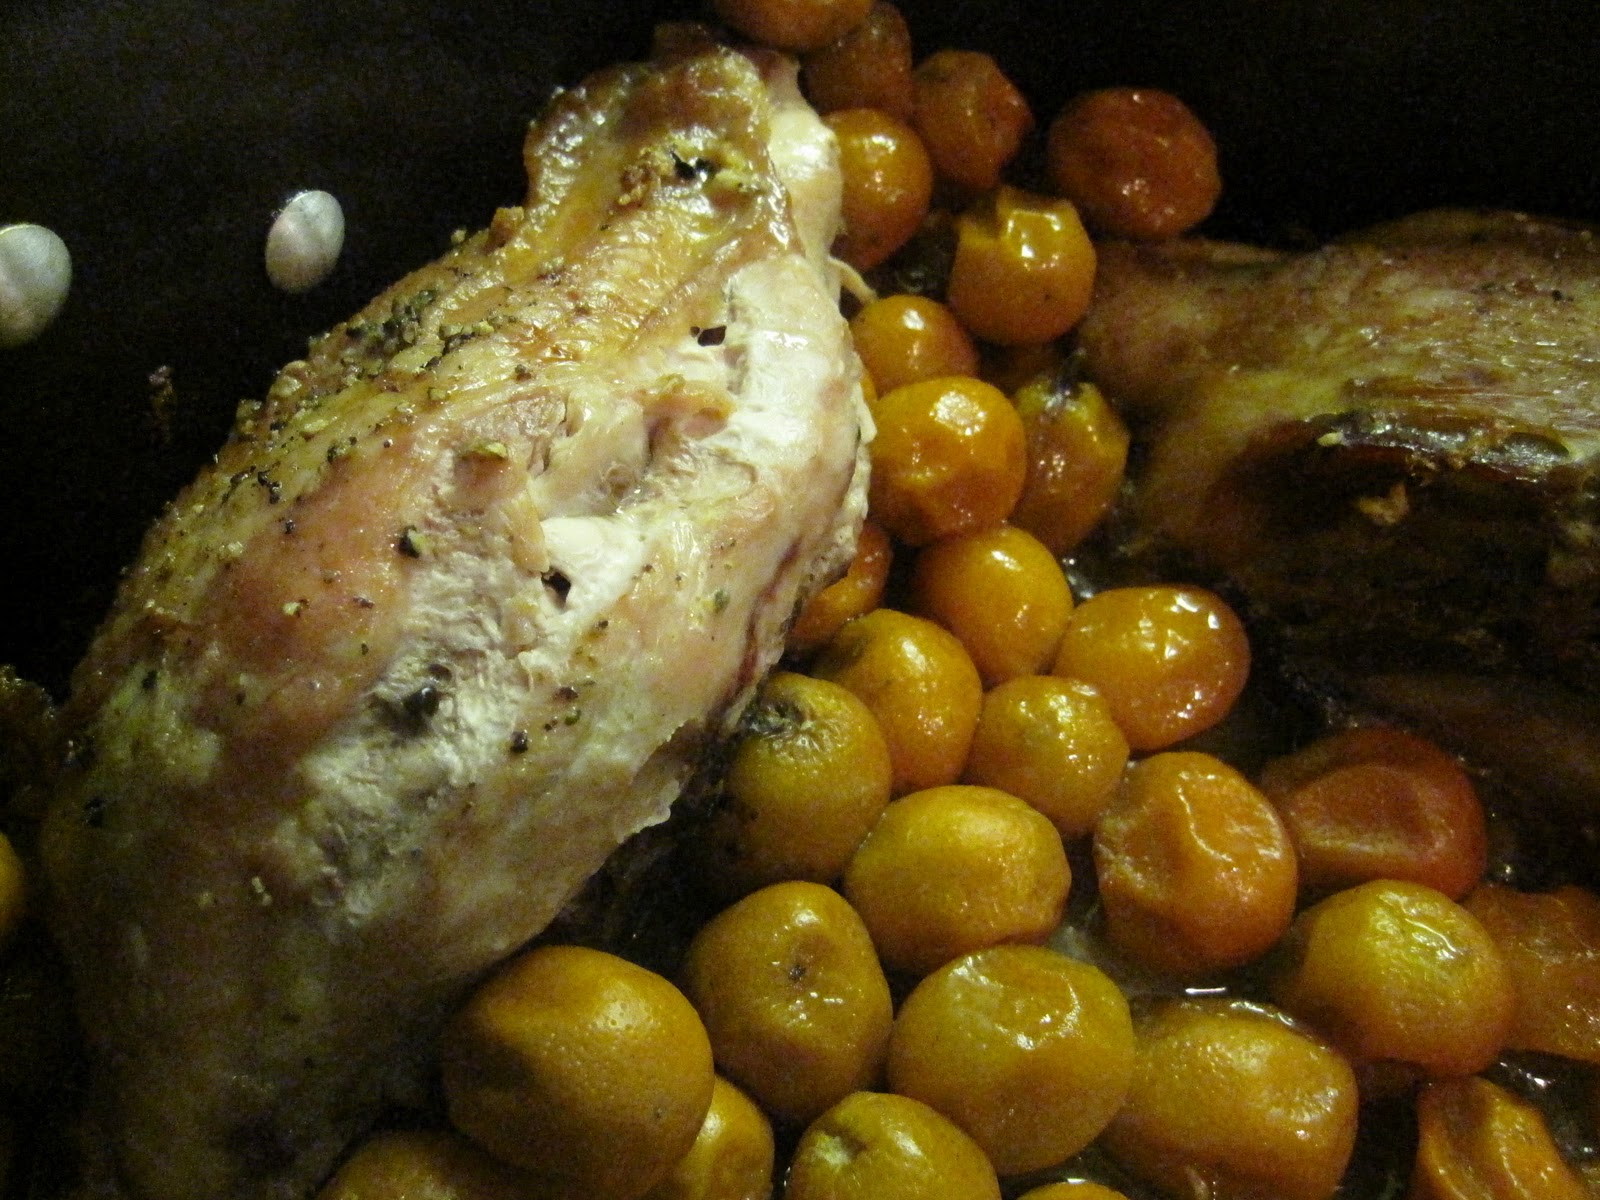
'Tis the season for citrus fruits.  Though we may not be able to get local citrus, if you want to keep with seasonal eating, winter is the time to choose oranges, grapefruits, and other citrus.  I was fortunate to receive a beautiful box of hand-picked citrus--including tons of kumquats--from my Alabama sister-in-law over the holidays.  Her grandparents live in the Florida pan-handle and have these fruits conveniently growing in their backyard.  Aw!  In my dreams!  The recipe was adapted from Elana's Pantry.


Cut-up Chicken with Kumquats
1 whole chicken (or cut-up)
1 T. olive oil
1 T. sea salt
1 head garlic
1/2 c. orange juice
1/2 c. water
2 T. honey
1 T. cornstarch
8 oz. kumquats, unpeeled

Rinse the chicken/chicken pieces and pat dry.  Place the chicken breast side up on a baking dish, then rub with oil and sprinkle with salt.  Stuff the head of garlic into the cavity of the chicken along with a couple kumquats.  In a large bowl, combine orange juice, water, honey, and cornstarch.  Pour juice mixture into baking dish around chicken and surround chicken with remaining kumquats.  Bake at 425 degrees for 20 min.  Lower heat to 375 and continue to roast the chicken until it is cooked through, about 40 min. (internal temp. should be 160 degrees.)  Remove from oven, let rest a few minutes and serve.