 |
| Gramma 'Cille's handy old scale |
I use a grinder attachment on my Kitchenaid mixer to grind the meat. You could certainly use a manual grinder. You might also have success with a food processor. We've realized that even when we use the smallest grinding plate, the consistency of the stuffed meat can still be too course. Though a sausage stuffer attachment is also available for an electric mixer, we use a manual stuffer that was a gift from my mother-in-law. This stuffer was salvaged from my husband's great grandmother's farm outside of Oil City in western Pennsylvania; on the side of the cast iron it says “Patented July 1858." Every year when we make sausage we think of Granny (she was tough as nails, I hear) making her own cased meats in the old farmstead kitchen. It took us a while to get the hang of using this stuffer and realize it was a two-person job. The first season we had the stuffing tube in all the wrong places (there was no manual for this piece of equipment so we had to guess.) But now we've got it down to a science--Ben loads the meat into the stuffer, I slip the casings onto the tube, he pushes the meat down and I gently guide the casings as they fill with meat then twist off the links and tie the ends. Et voila!
Smoked Bratwurst
Makes about 3 lbs.
Recipe from Bruce Aidells' Complete Sausage Book.
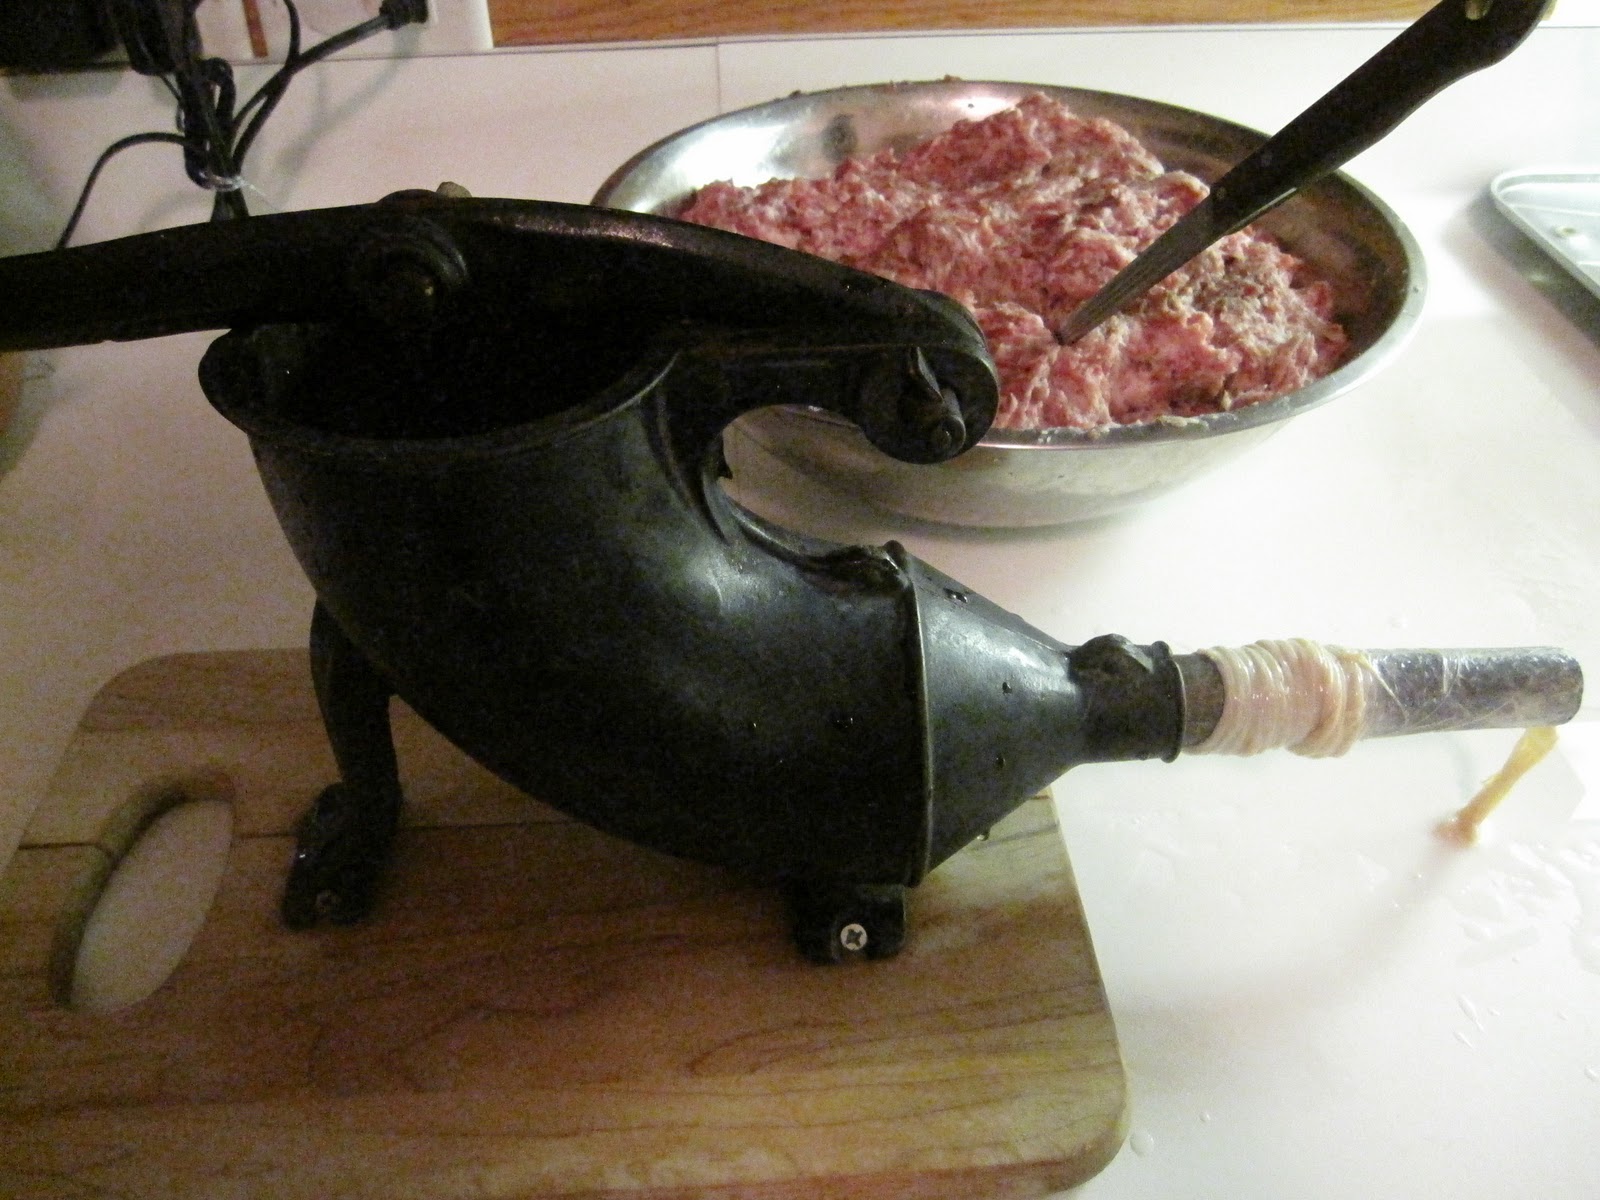 |
| The old stuffer with casings in place |
2 1/2 lbs. pork butt, or 2 lbs. pork butt and 1/2 lb. beef chuck
*1/2 lb. pork back fat
1 T. kosher salt
1 T. coarsely ground black pepper
1 T. coarsely ground mustard seed
2 t. minced garlic
2 t. sugar
1 t. ground mace
1 t. dried sage
1/2 t. ground nutmeg
1/2 c. water
3/4 t. curing salts (optional...I don't add them)
**Medium hog casings
 |
| Stuffed! |
Mix the meat, fat, salt, black pepper, mustard seeds, garlic, sugar, mace, sage, and nutmeg in a large bowl. Grind the mixture through a 1/4-inch plate. Add the water. Add the curing salts, if you intend the cold smoke the sausages. Knead and squeeze the mixture to blend all the ingredients thoroughly. Stuff into medium hog casings, and tie in 5- to 6-inch links. If you choose to cold smoke the brats and have mixed in the curing salts, air-dry the sausages in front of a fan overnight. Cold smoke for 12 to 24 hours according to smoker directions. Bratwurst can also be successfully hot smoked. Hot smoke to an internal temperature of 155 to 160 degrees. The smoked sausages will keep for 5 days refrigerated, or for at least 2 months frozen (though they last much longer for us if wrapped properly.) Unsmoked sausages will keep for 3 days refrigerated.
Italian Sweet Fennel Sausage
Makes about 4 lbs.
Also from Bruce Aidells' Complete Sausage Book. Stuff these into casings as well or freeze in small portions in bulk--I use an ice cream scoop and line a sheet tray with balls of raw meat, freeze then transfer to a labeled freezer bag.

3 lbs. pork butt
3/4 lb. pork back fat
1/2 c. dry red wine
4 garlic cloves, minced
2 T. fennel seeds
1 T. freshly ground black pepper
4 t. kosher salt
1 t. dried oregano
1/8 t. ground allspice
Medium hog casings (optional)
Grind the pork and fat together through a 3/8-inch plate. In a large bowl. combine the pork and fat with the wine, garlic, fennel, black pepper, salt, oregano, and allspice. Mix well with your hands. Shape into patties, or stuff into casings and tie into 5-inch links. The sausage will keep for 3 days in the refrigerator, or for at least 2 months in the freezer, if wrapped properly.
*When you order/purchase pork fat, be sure it's solid back fat. This year, I didn't specify and was given a package of soft pork fat that was much more difficult--though not impossible--to incorporate into the ground meat.
**Sausage casings, both natural and synthetic, as well as other meat processing tools and ingredients can be purchased at Haught Distributing in Menomonee Falls.
This was the main culinary event for the weekend, but since it went more smoothly than ever before, I still had energy to do some baking today. I'm trying to perfect my gluten-free vegan baking skills. I opt for vegan recipes because they leave out the dairy and eggs I can no longer eat. Though I realized today that if I have access to lard (mostly in the case of pie or pastry crusts), I don't have to limit my recipes to those without animal products...but I guess I'm already straying from that because I use honey and gelatin here and there. Anyway, my current project is to find a good gluten-free vegan brownie recipe. I made a pumpkin brownie recipe last week that had a lot to be desired in terms of consistency. I may revisit the ingredient list at some point, but today I tried something different and had great results (though I'm still striving for that characteristic crackled brownie crust.)
Vegan Blueberry Brownies
Makes about a dozen brownies
Adapted from a recipe on the blog Gluten-Free Goddess. For the blueberries, I used the "mush" I had leftover and frozen from my blueberry juice making process. You could certainly just use frozen or fresh and pureed whole blueberries. These are nice and moist! I believe they could be a hit even with the gluten-, dairy-, and egg-loving crowd.
1/2 c. coconut oil
 1/2 c. gluten-free, dairy-free chocolate chips (I recommend Enjoy Life brand)
3/4 c. sorghum flour
1/4 c. potato starch
1/3 c. pure cocoa powder
1 t. gluten-free baking powder
1 t. sea salt
1 t. xanthan gum
1/2 c. xylitol
1/2 c. sucanat
1 1/2 t. egg replacer whisked with 2 T. warm water
2 t. gluten-free vanilla extract
1 T. maple syrup (or honey)
1/2 c. hot water
1 c. pureed blueberries
Preheat oven to 350 degrees. Grease a square baking pan and set aside. Melt coconut oil and chocolate chips in the top of a double boiler. Whisking until incorporated. Set aside. Combine all ingredients--flour through sucanat--in a large mixing bowl. Add diluted egg replacer, vanilla extract, syrup, and hot water. Mix to combine. Stir in blueberry puree and chocolate mixture and mix thoroughly. Pour into prepared pan and bake 35 min. or until toothpick inserted in center comes out clean. Let cool in pan. Cut and enjoy.
Thanks for the sausage recipe! I made some breakfast sausage a few weekends ago (my first attempt at sausage and using my grinder attachment). It was fun! And thanks for the link to Haught Distr. I had no idea where to get some casings around here. I ended up buying some on Amazon.
ReplyDeleteI've been meaning to metion to you...I stopped in to Sheridan's about a month ago for lunch. I'm normally not a coleslaw eater, but I thought I'd try some anyway (hey...they put it on my plate!). OMG! It was wonderful! It was so sweet and fresh and crunchy! Do they not use mayo or something? I think that's why I don't care for coleslaw...I'm not a fan of mayo. If you could sneak me the recipe, I'd be forever grateful! :)
I will never try to make sausage, but I love watching you do it!!! Actually, that pretty much sums up our friendship...It always makes me so hungry reading your blog. I feel like we just had coffee together. XOXO Karen
ReplyDelete